SD - 系统设计查漏/速记/复习
本文档旨在快速复习系统设计各个题型的重难点和考点
02 Design Youtube
Step 1. Functional Requirements
- Users can upload videos. 用户可以上传视频。
- Users can watch (stream) videos. 用户可以观看 (流式传输)视频。
- Users can view information about a video, such as view counts.
- Users can search for videos.
- Users can comment on videos.
- Users can see recommended videos.
- Users can subscribe to channels.
Step 2. Non-functional Requirements
- The system should be highly available (availability >> consistency). 系统应该具有高可用性 (优先考虑可用性而不是一致性)。
- The system should support uploading and streaming large videos (10s of GBs). 该系统应支持上传和流式传输大型视频 (数十 GB)。
- The system should allow for low latency streaming of videos, even in low bandwidth environments. 即使在低带宽环境下,该系统也应允许低延迟的视频流传输。
- The system should scale to a high number of videos uploaded and watched per day (~1M videos uploaded per day, 100M videos watched per day). 该系统应可扩展到每天上传和观看的大量视频 (每天上传约 100 万个视频,每天观看 1 亿个视频)。
- The system should support resumable uploads. 系统应支持断点续传。
- The system should protect against bad content in videos. 该系统应该防止视频中出现不良内容。
Step 3. Core Entities
- User
- Video
- Video Metadata
Step 4. APIs
- 用户上传视频
POST /upload {Video, Video Metadata}
- 用户播放视频
GET /videos/{videoId} -> Video & Video Metadata
Step 7. Deep Dives and Best Solutions
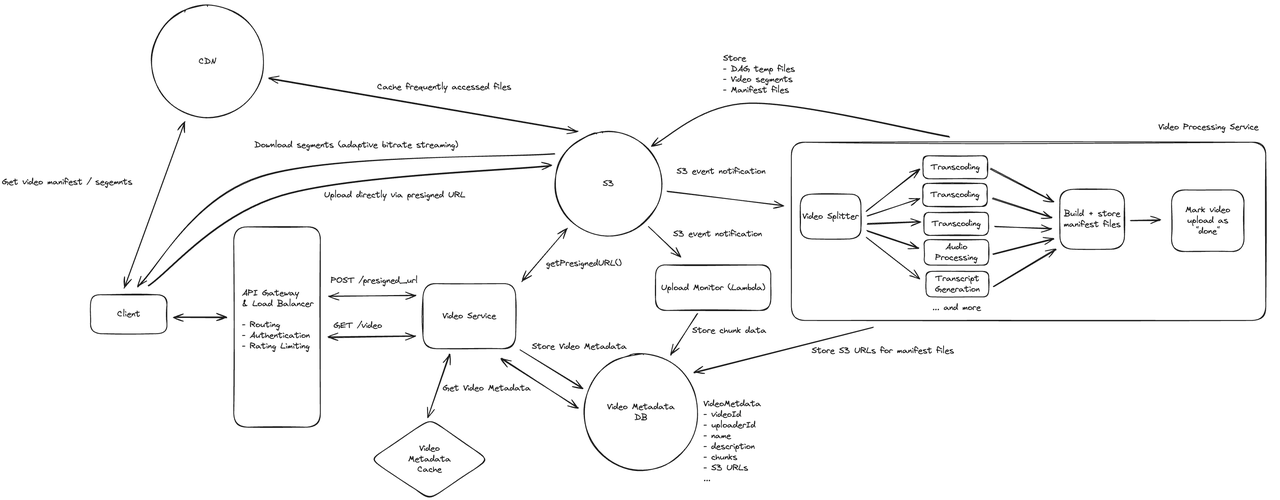
7.1 How can we handle processing a video to support adaptive bitrate streaming? 我们如何处理视频以支持自适应比特率流
7.2 How do we support resumable uploads? 我们如何支持断点续传
- 1. 创建上传会话 (Upload Session)
- POST /uploads (鉴权后):服务端生成:upload_id (业务侧),s3_upload_id (S3 Multipart 的 UploadId),建议下发推荐分片大小 (见“分片大小策略”)。
- 返回 预签名上传 URL 申请接口的指令 (见第 3 步)。
- 在 DB (如 DynamoDB/Postgres)建 uploads 表 + upload_parts 表并写入初始状态 (见“数据模型/状态机”)。
- 2. 提交文件与分片指纹
- 客户端可上传整体文件 SHA-256 与各分片校验和 (推荐 S3 原生校验:CRC32C/SHA256),便于秒传/去重与完整性校验。
- 3. 按需申请预签名 URL - 分批
- POST
/uploads/{id}/presign请求一批 partNumbers 的 PUT 预签名 URL (每次 100~500 个,避免一次签太多)。 - 服务端把UploadId + partNumber编码进 URL 权限范围,有效期短 (如 30~60 分钟)。
- POST
- 4. 并行上传分片 (客户端 → S3)
- 客户端用预签名 URL 并行上传,带上 x-amz-checksum-crc32c/x-amz-checksum-sha256 (S3 会校验,强烈推荐),并记录 S3 返回的 ETag。
- 上传成功后客户端回调:POST
/uploads/{id}/parts/{partNumber}/report {etag, checksum, size}. - 服务端将该 part 标记为 UPLOADED 并保存 etag/checksum/bytes。
- (增强可靠性)服务端可抽样或按阈值调用 ListParts 与 S3 结果对账,标记为 VERIFIED。
- 5. 断点续传
- 任何时刻 GET
/uploads/{id}返回每个 part 的状态 (NOT_UPLOADED/UPLOADING/UPLOADED/VERIFIED),客户端据此只补缺失分片。 - 客户端也可请求 presign 新一批 URL 继续上传。
- 跨设备恢复:只需持有 upload_id (或通过“整体文件指纹+用户”查回最近会话)。
- 任何时刻 GET
- 6. 合并提交 (服务端完成)
- 当所有 part 为 VERIFIED,服务端执行 CompleteMultipartUpload (带上 [partNumber, ETag] 列表)。
- S3 生成最终对象并触发单个 ObjectCreated 事件 → 触发转码编排 (SQS/SFN/MediaConvert/FFmpeg-on-EKS)。
- 业务侧 VideoMetadata.status 从 UPLOADED → PROCESSING。
- 7. 清理与失败恢复
- 超时 GC:定时任务 (或 Step Functions)扫 uploads 表,对超过 TTL (如 72h)未完成的会话执行 AbortMultipartUpload,并回收 DB 记录。
- 中止:
POST /uploads/{id}/abort用户主动取消,服务端同样 AbortMultipartUpload。
Uploads
- id: 业务 upload_id
- user_id
- file_sha256: 全文件指纹,便于秒传/去重
- bucket, object_key
- s3_upload_id
- part_size
- status:
INIT → UPLOADING → READY_TO_COMPLETE → COMPLETING → UPLOADED → PROCESSING → DONE/FAILED - created_at, expires_at
Upload_parts
- (upload_id, part_number) 主键
- fingerprint (可选,各分片哈希)
- etag, checksum_crc32c/sha256, bytes
- status:NOT_UPLOADED → UPLOADING → UPLOADED → VERIFIED
- updated_at
状态推进规则
- 客户端回调或服务端 ListParts 对账后,part→UPLOADED/VERIFIED;
- 全部分片 VERIFIED ⇒ 会话 READY_TO_COMPLETE;
- CompleteMultipartUpload 中置为 COMPLETING;成功后置 UPLOADED 并发转码.
分片大小策略 - 避免 1 万分片上限
- S3 限制: 最小 5MB/分片 最后一片可
less than 5MB,最大分片数 10,000。 - 推荐: 按文件大小自适应,目标分片数 ≈ 1k 内:
part_size = max(ceil(file_size / 10000), 8MB),常用 8–64MB;超大文件 (>50GB)可提升到 128–256MB。
- 移动端网络抖动大,可选择 10��–16MB 取得更细粒度重传与更高成功率。
客户端并发与重试
- 并发窗口: 建议 4–16 并发 (移动端 3–6),根据 RTT 与带宽自适应;
- 重试: 对 5xx/网络错误指数退避 + 抖动 (Jitter);同一 part 重传需保持相同 partNumber;
- URL 过期: 过期即重新申请 presign;
- 幂等: 重复上报 reportPart 时,若 (partNumber, etag/checksum) 相同即幂等成功,若不同则标记冲突并要求客户端重传该分片。
安全与配额
- 预签名 URL 权限仅限该 UploadId+partNumber,短时有效.
- 服务端对每用户/会话限流与配额 (最大并发、峰值带宽、未完成会话上限).
- SSE-KMS 加密对象;注意 KMS 情况下不要依赖 ETag 作为 MD5,统一使用 S3 校验和头或自算指纹.
- 病毒/恶意内容:完成后入“隔离处理队列”,扫描通过再入转码.
7.3 How do we scale to a large number of videos uploaded / watched a day? 我们如何扩大每天上传/观看大量视频的数量
Our system assumes that ~1M videos are uploaded per day and that 100M videos are watched per day. This is a lot of traffic and necessitates that all of our systems scale and ensure a solid experience for end users.
我们的系统假设每天上传约100万个视频,每天观看1亿个视频。这是一个巨大的流量,因此我们所有的系统都必须具备可扩展性,并确保最终用户获得稳定的体验。
Let's walk through each major system component to analyze how it will scale: 让我们逐步了解每个主要系统组件,分析其如何扩展:
- Video Service
- This service is stateless and will be responsible for responding to HTTP requests for presigned URLs and video metadata point queries. It can be horizontally scaled and has a load balancer proxying it.
- 此服务无状态,负责响应预签名 URL 的 HTTP 请求和视频元数据点查询。它可以水平扩展,并由负载均衡器代理。
- Video Metadata
- This is a Cassandra DB and will horizontally scale efficiently due to Cassandra's leaderless replication and internal consistent hashing. Videos will be uniformly distributed as the data will be partitioned by videoId. Of note, a node that houses a popular video might become "hot" of that video is popular, which could be a bottleneck.
- 这是一个 Cassandra 数据库,得益于 Cassandra 的无领导复制和内部一致性哈希技术,可以高效地水平扩展。由于数据将按 videoId 进行分区,因此视频将均匀分布。 值得注意的是,如果某个热门视频的节点很受欢迎,它可能会变成“热门”节点,这可能会成为瓶颈。
- Video Processing Service
- This service can scale to a high number of videos and can have internal coordination around how it distributes DAG work across worker nodes. Of note, this service will likely have some internal queuing mechanism that we don't visualize. This queue system will allow it to handle bursts in video uploads. Additionally, the number of jobs in the queue might be a trigger for this system to elastically scale to have more worker nodes.
- 此服务可扩展到处理大量视频,并能够内部协调如何在工作节点之间分配 DAG 工作。值得注意的是,此服务可能包含一些我们未直观看到的内部排队机制。该队列系统将使其能够处理视频上传的突发流量。此外,队列中的作业数量可能会触发此系统弹性扩展以容纳更多工作节点。
- S3
- S3 scales extremely well to high traffic / high file volumes. It is multi-region and can elastically scale. However, the data center that houses S3 might be far from some % of users streaming the video if the video is streamed by a wide audience, which might slow down the initial loading of a video or cause buffering for those users.
- 拥有极佳的扩展性,能够应对高流量/高文件量。它支持多区域,并可弹性扩展。 然而,如果视频的观看者群体广泛,那么 S3 所在的数据中心可能距离部分观看视频的用户较远,这可能会减慢视频的初始加载速度,或导致这些用户出现缓冲。
解决"热门"视频问题
To address the "hot" video problem, we can consider tuning Cassandra to replicate data to a few nodes that can share the burden of storing video metadata. This will mean that several nodes can service queries for video data. Additionally, we can add a cache that will store accessed video metadata. This cache can store popular video metadata to avoid having to query the DB for it. The cache can be distributed, use the least-recently-used (LRU) strategy, and partitioned on videoId as well. The cache would be a faster way to retrieve data for popular videos and would insulate the DB a bit.
- 我们可以考虑调整 Cassandra,将数据复制到几个可以分担存储视频元数据负担的节点。这意味着多个节点可以处理视频数据查询。
- 此外,我们可以添加一个缓存来存储访问过的视频元数据。
- 这个缓存可以存储热门视频元数据,避免查询数据库。
- 缓存可以采用分布式设计,使用最近最少使用 (LRU) 策略,并根据视频 ID 进行分区。
解决远离S3数据中心的流媒体播放问题
To address the streaming issues for users who might be far away from data centers with S3, we can consider employing CDNs. CDNs could cache popular video files (both segments and manifest files) and would be geographically proximate to many users via a network of edge servers. This would mean that video data would have to travel a significantly shorter distance to reach users, reducing slowness / buffering. Also, if all the data (manifest files and segments) was in the CDN, then the service would never need to interact with the backend at all to continue streaming a video.
- 我们可以考虑使用 CDN。CDN 可以缓存热门视频文件 (包括片段和清单文件),并通过边缘服务器网络在地理位置上接近众多用户。
- 这意味着视频数据到达用户的传输距离将显著缩短,从而减少缓慢/缓冲。
- 此外,如果所有数据 (清单文件和片段)都存储在 CDN 中,那么该服务将无需与后端交互即可继续播放视频。
06 Design Instagram
Step 1. Functional Requirements
(占位)
Step 2. Non-functional Requirements
(占位)
Step 3. Core Entities
(占位)
Step 7. Deep Dives and Best Solutions
(占位)
07 Design Uber
Step 1. Functional Requirements
- Riders can input start & destination and get fee estimate. (乘客可估价)
- Riders can request a ride. (乘客可发单)
- Match rider with nearby available driver. (匹配附近空闲司机)
- Drivers accept/decline & navigate. (司机接/拒单与导航)
Step 2. Non-functional Requirements
- 低延迟匹配 (< 1 min) 成功匹配或失败回退。
- 强一致的分配 (同一时刻司机不可被多派单)。
- 高吞吐:高峰期同地段
100k请求。
Step 3. Core Entities
- Ride
{id, rider_id, driver_id, vehicle, status, pickupTS, dropoffTS, fee, route}
- Location
{id, driver_id, latitude, longitude, timestamp, ...}
- Fee
{id, pickup, dropoff, eta, fee_amount}
- Rider
{id, name, ...}
- Driver
{id, name, vehicle_info, current_location, status}
Step 4. APIs
- 请求预估费用
POST /fee{rider_id, pickup_location, destnation}rpc EstimateFee(EstimateFeeRequest)
- 请求一个 ride
POST /ride{fee_id}rpc CreateRide(CreateRideRequest)
- 司机端上报实时地址
POST /drivers/location{lon, lat}rpc StreamDriverLocation(stream Location)
- 司机端接单
PATCH /rides/{rideId}{accept|deny}rpc AcceptRide(AcceptRideRequest)
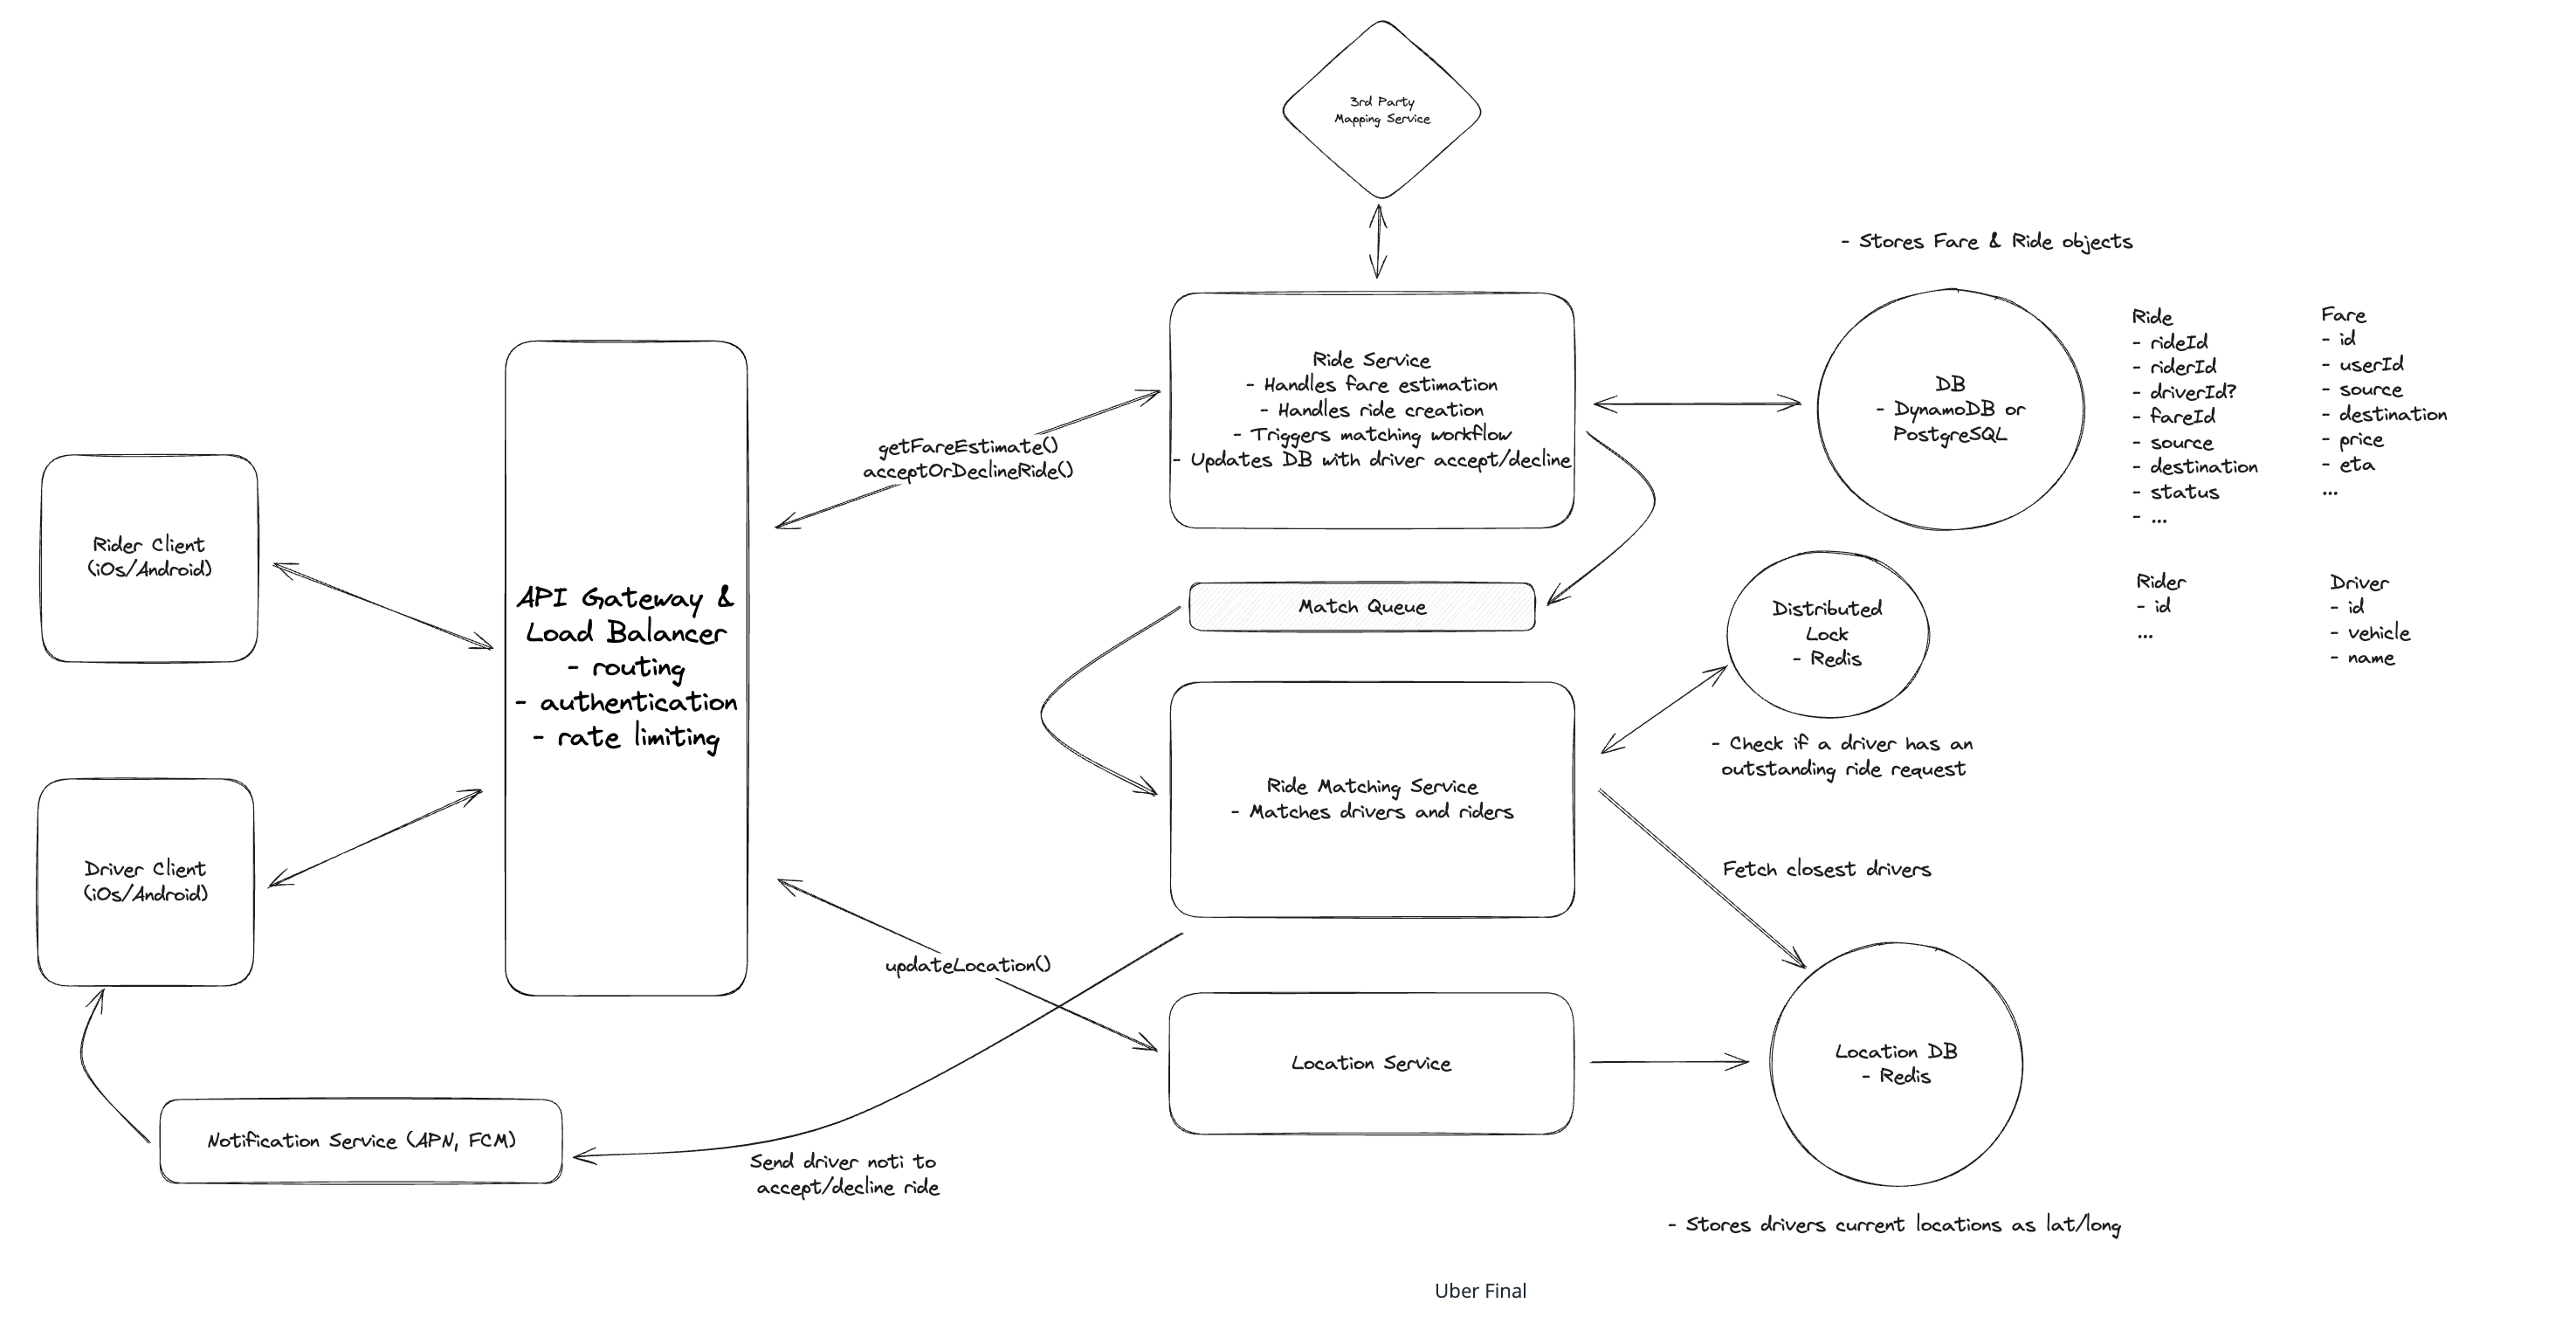
Step 5. Services
- Ride Service
- Ride Matching Service
- Map Service
- Location Service (Uber's open sourced hexagon clusters or we say indexes of city and area)
- Notification Service (APNs, Firebase)
Step 6. Storage
- Ride DB / Location DB
Step 7. Deep Dives and Best Solutions
7.1 How do we handle frequent driver location updates and efficient proximity searches on location data? 我们如何处理频繁的驾驶员位置更新和位置数据的有效邻近搜索?
- Use Redis or SSD storage with TTL to handle high-throughput location updates and queries.
- Ensure high availability and correctness with replicas and persistent storage.
- Build space indexes (e.g., H3) to speed up nearby driver searches and reduce distance calculation time.
7.2 How can we manage system overload from frequent driver location updates while ensuring location accuracy? 如何在确保位置准确性的同时管理频繁更新驾驶员位置造成的系统过载?
- Adjust the frequency of location updates based on context factors like speed, routes, traffic, or info from other nearby drivers
- Enhance mobile device functionality and sensor
7.3 How do we prevent multiple ride requests from being sent to the same driver simultaneously? 如何防止多个乘车请求同时发送给同一司机?
- Use a distributed lock (e.g., Redis or ZooKeeper) with a 10-second TTL to lock the driver during assignment.
- If the driver doesn’t respond within 10s, release the lock and forward the request to another nearby driver.
- Ensure the lock service is highly available and fault-tolerant to avoid race conditions or deadlocks.
7.4 How can we ensure no ride requests are dropped during peak demand periods? 我们如何确保在高峰需求期间不会丢失乘车请求?
- MQ (Kafka) with auto scaling, setup partition/consumers
- Reduce rebalancing happen times
7.5 What happens if a driver fails to respond in a timely manner? 如果司机未能及时响应会发生什么?
7.6 How can you further scale the system to reduce latency and improve throughput? 如何进一步扩展系统以减少延迟并提高吞吐量?
- Geo-sharding of Read Replicas, and 保证热点地区、城市的可用性。Avoid Hot key problem
- 增大资源给 Hot area, less resources for other areas
12 Design Dropbox
Step 1. Functional Requirements
- Users should be able to upload a file from any device. 用户应该能够从任何设备上传文件
- Users should be able to download a file from any device. 用户应该能够从任何设备下载文件
- Users should be able to share a file with other users and view the files shared with them. 用户应该能够与其他用户共享文件并查看与他们共享的文件
- Users can automatically sync files across devices. 用户可以跨设备自动同步文件
- Users should be able to edit files. 用户应该能够编辑文件
- Users should be able to view files without downloading them. 用户无需下载即可查看文件
Step 2. Non-functional Requirements
- The system should be highly available (prioritizing availability over consistency).
- availability >> consistency
- The system should support files as large as 50GB.
- The system should be secure and reliable. We should be able to recover files if they are lost or corrupted.
- 系统应安全可靠。文件丢失或损坏后,应能够恢复。
- The system should upload, download, and sync times as fast as possible (low latency).
- 系统上传、下载、同步时间应尽可能快 (低延迟)
- The system should have a storage limit per user.
- 系统应该对每个用户设置存储限制。
Step 3. Core Entities
- File
id, storage_path, file_name, total_chunks, file_size
- FileChunk
file_id, chunk_index, storage_path, size, checksum, version, ts, status
- File Metadata
id, owner_id, file_id, file_name, file_type, file_size, version, ts, is_deleted, checksum, shared_with, access_permission, parent_folder_id, can_preview
- User
id, name, email, hashed_password, created_at, storage_limit, used_storage, devices
Step 4. APIs
- 用户上传文件
POST /files/upload {bytes[] File, FileMetadata}
- 用户下载文件
GET /files/{fileId} -> bytes[] File & FileMetadata- 客户端可以多线程并行下载所有 chunks 并按照顺序拼接
GET /files/{fileId}/chunks -> chunks metadata {index+storage_path+checksum}
- 用户共享文件
POST /files/{fileId}/share {user_ids[], permission(read/write)}- 取消分享:
DELETE /files/{fileId}/share {user_ids[]}
- 让客户端查询远程服务器上单个文件的更改
GET /files/{fileId}/changes -> FileMetadata[]
- 查看当前用户下所有文件的变更列表
GET /sync/changes?since=timestamp&device_id=xxx- Response:
{ file_id, version, change_type: "modified" | "deleted", updated_at }
- 获取可预览的链接 (PDF, doc, image)
GET /files/{fileId}/preview -> preview_url
- 获取用户所有可访问的文件
GET /files?filter=all|shared|owned
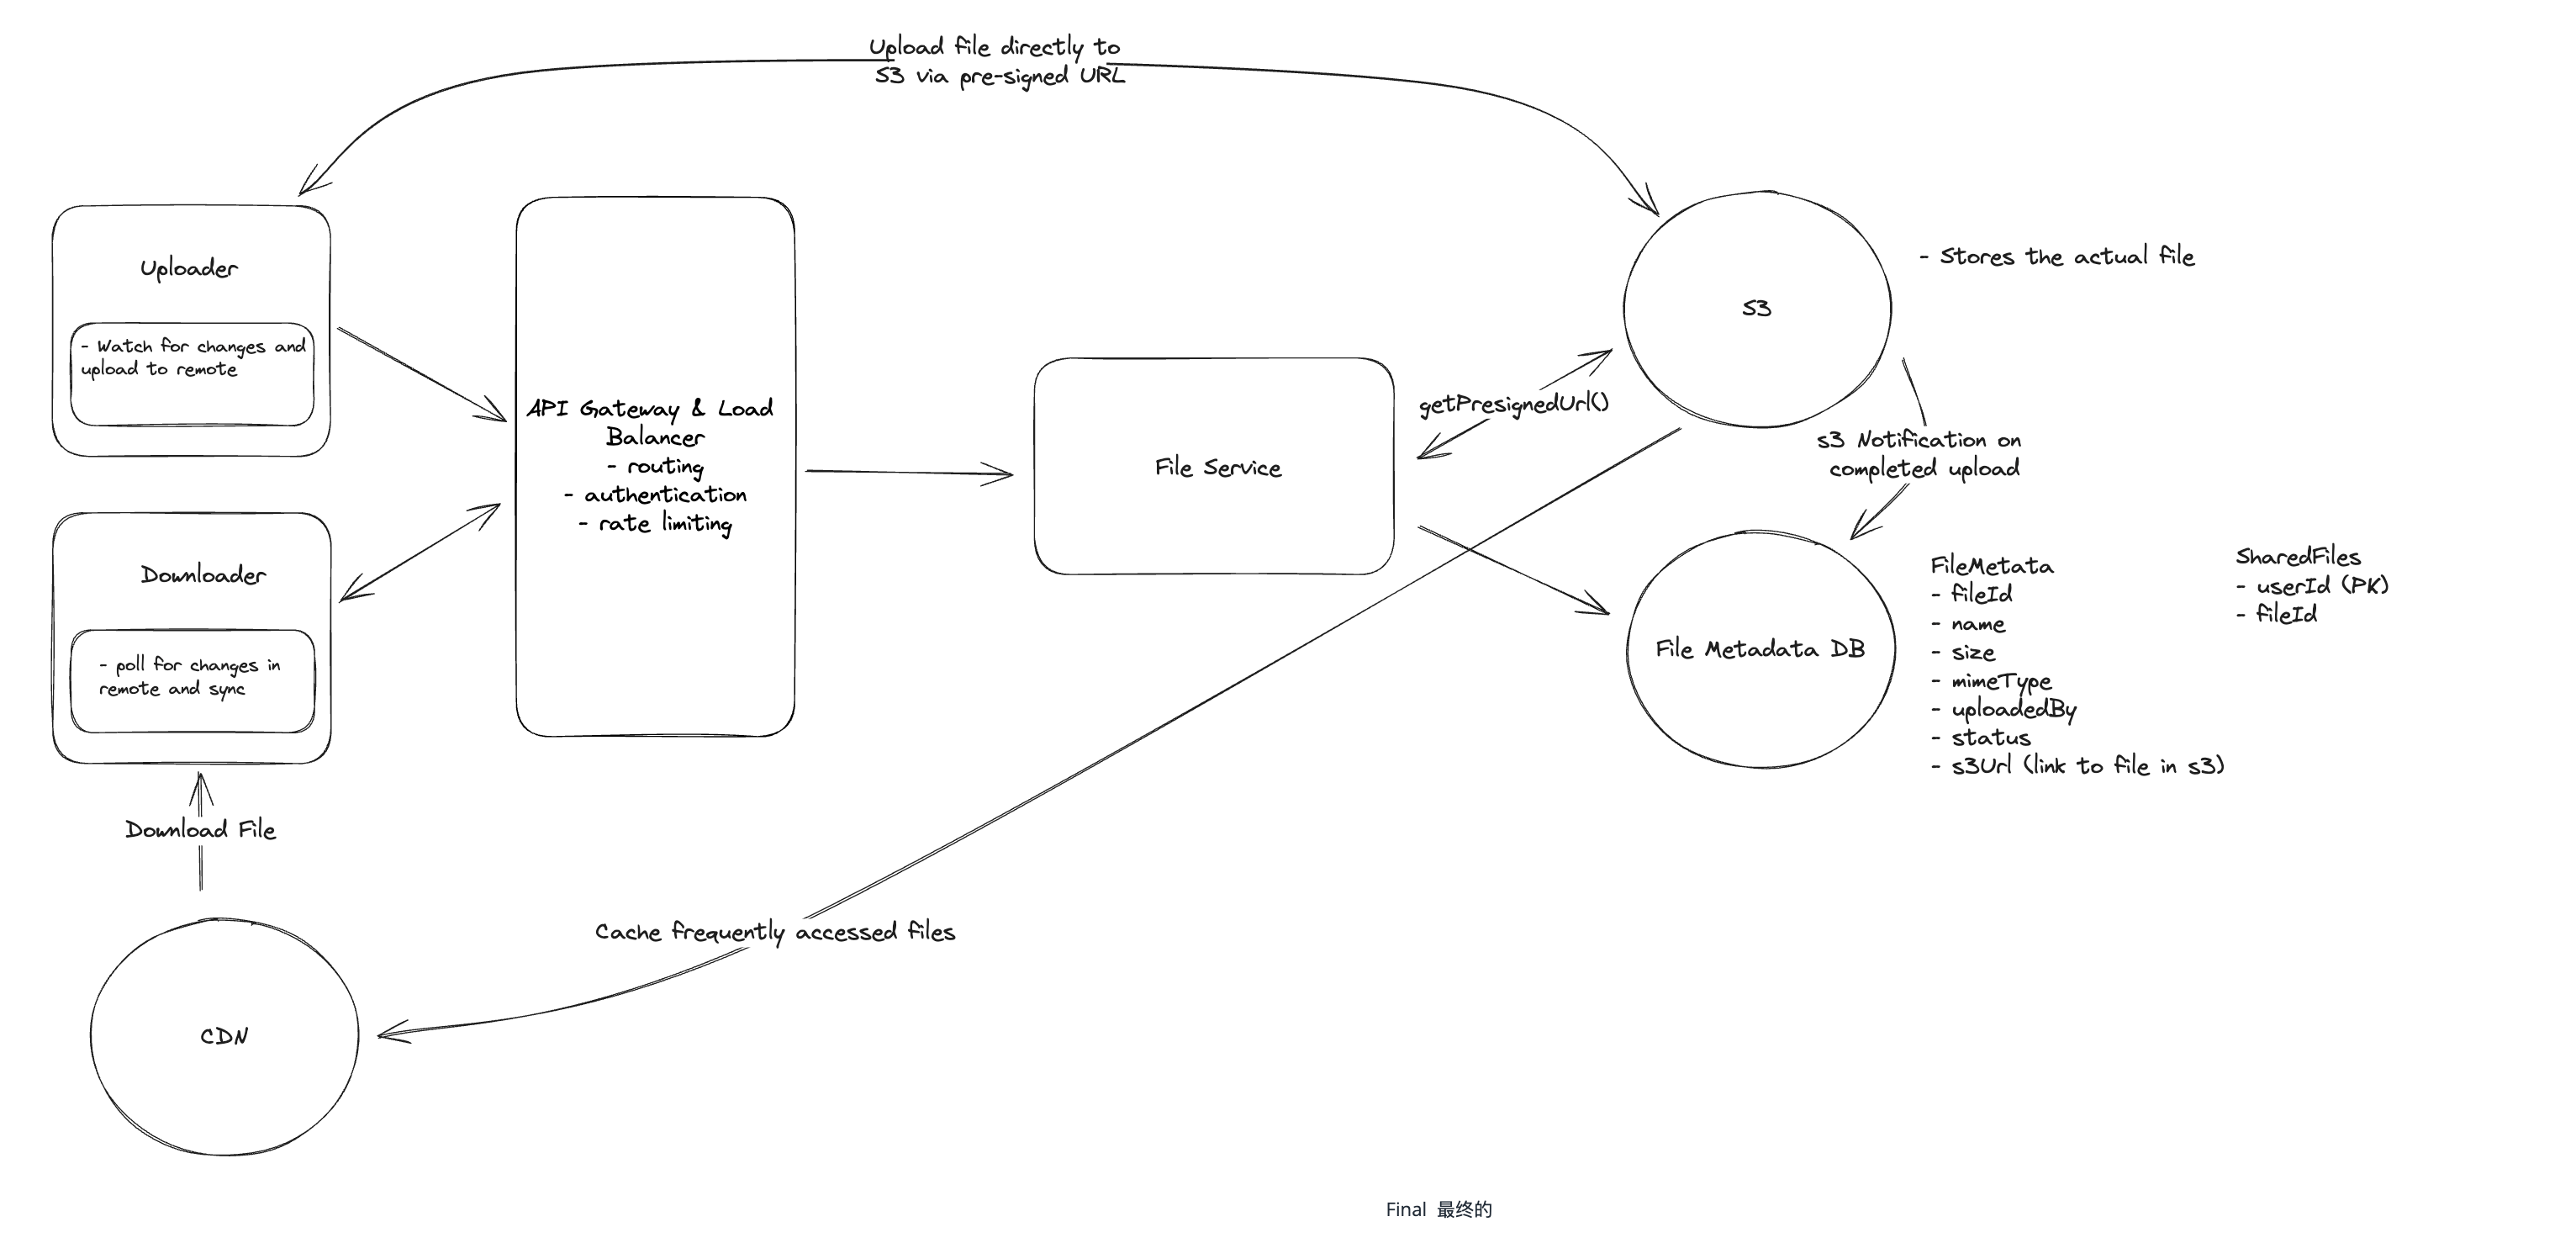
Step 5. Services
- User Service
- Register, login
- Devices add or delete
- Auth & Access Service
- Generate and validate token
- File Access Controller(owner/shared/roles)
- File Metadata Service
- Folder relationship, metadata
- File Storage Service
- Manage lifecycle of File and FileChunk, upload, download, sharding
- Connected to Object Storage like S3 or Google Cloud Storage
- Sync Service
- Support file sync and up-to-date cross devices
- Preview and Editor Service
- Convert images/PDFs/documents to displayable formats
- Supports online editing of lightweight files such as markdown/text/JSON
- Notification Service
- Notifications of files being finished uploading, shared, updated, or deleted
- Client device login notification
- CDN
- Fast distribution of static content and accelerated preview
Step 6. Storage
(占位:元数据 DB、对象存储、缓存层)
Step 7. Deep Dives and Best Solutions
7.1 How can you support large files? 如何支持大文件
两个核心要求
- Progress Indicator
- Users should be able to see the progress of their upload so that they know it's working and how long it will take. 用户应该能够看到上传的进度,以便知道上传正在进行以及需要多长时间。
- Resumable Uploads
- Users should be able to pause and resume uploads. If they lose their internet connection or close the browser, they should be able to pick up where they left off rather than redownloading the 49GB that may have already been uploaded before the interruption. 用户应该能够暂停和恢复上传。如果网络连接中断或关闭浏览器,他们应该能够从中断的地方继续上传,而不是重新下载中断前可能已经上传的 49GB 数据。
在深入探讨解决方案之前,让我们花点时间来了解通过单个 POST 请求上传大文件所带来的限制。
- Timeouts 超时
- Web servers and clients typically have timeout settings to prevent indefinite waiting for a response. Web 服务器和客户端通常具有超时设置,以防止无限期地等待响应。单个 50GB 文件的 POST 请求很容易超过这些超时设置。事实上,在面试中,这或许是一个进行快速计算的好时机。如果我们有一个 50GB 的文件,并且互联网连接速度为 100Mbps,那么上传该文件需要多长时间?
- 50GB * 8 bits/byte / 100Mbps = 4000 seconds = 1.1 Hr
- Browser and Server Limitation 服务器限制
- In most cases, it's not even possible to upload a 50GB file via a single POST request due to limitations configured in the browser or on the server. Both browsers and web servers often impose limits on the size of a request payload.
- 大多数情况下,由于浏览器或服务器配置的限制,甚至无法通过单个 POST 请求上传 50GB 的文件。浏览器和 Web 服务器通常都会对请求负载的大小施加限制。例如,Apache 和 NGINX 等流行的 Web 服务器虽然有可配置的限制,但默认限制通常小于 2GB。大多数现代服务 (例如 Amazon API Gateway)的默认限制要低得多,而且无法提高。对于我们在设计中使用的 Amazon API Gateway,默认限制仅为 10MB。
- Network Interruptions 网络中断
- Large files are more susceptible to network interruptions. If a user is uploading a 50GB file and their internet connection drops, they will have to start uploading from scratch.
- 大文件更容易受到网络中断的影响。如果用户正在上传一个 50GB 的文件,而网络连接突然中断,则必须从头开始上传。
- User Experience
- Users are effectively blind to the progress of their upload. They have no idea how long it will take or if it's even working. 用户实际上对上传进度一无所知。他们不知道上传需要多长时间,甚至不知道上传是否成功。
To address these limitations, we can use a technique called "chunking" to break the file into smaller pieces and upload them one at a time (or in parallel, depending on network bandwidth). Chunking needs to be done on the client so that the file can be broken into pieces before it is sent to the server (or S3 in our case). A very common mistake candidates make is to chunk the file on the server, which effectively defeats the purpose since you still upload the entire file at once to get it on the server in the first place. When we chunk, we typically break the file into 5-10 MB pieces, but this can be adjusted based on the network conditions and the size of the file.
为了解决这些限制,我们可以使用一种称为 "分块" 的技术,将文件拆分成更小的块,并一次上传一个 (或者并行上传,具体取决于网络带宽)。分块需要在客户端完成,以便在文件发送到服务器 (在本例中是 S3)之前将其拆分成多个块。候选人常犯的一个错误是在服务器上对文件进行分块,这实际上违背了分块的目的,因为你仍然需要一次性上传整个文件才能将其上传到服务器。当我们进行分块时,我们通常会将文件拆分成 5-10 MB 的小块,但这可以根据网络状况和文件大小进行调整。
With chunks, it's rather straightforward for us to show a progress indicator to the user. We can simply track the progress of each chunk and update the progress bar as each chunk is successfully uploaded. 使用分块上传,我们可以相当直接地向用户显示进度指示器。我们可以简单地跟踪每个分块的进度,并在每个分块成功上传后更新进度条。
The next question is: How will we handle resumable uploads? We need to keep track of which chunks have been uploaded and which haven't.
我们该如何处理可断点上传?我们需要跟踪哪些数据块已上传,哪些尚未上传。
- We can do this by saving the state of the upload in the database, specifically in our FileMetadata table. Let's update the FileMetadata schema to include a chunks field.
- 我们可以通过将上传状态保存到数据库中 (具体来说是在 FileMetadata 表中)来实现这一点.
- When the user resumes the upload, we can check the chunks field to see which chunks have been uploaded and which haven't. We can then start uploading the chunks that haven't been uploaded yet. This way, the user doesn't have to start uploading from scratch if they lose their internet connection or close the browser.
- 当用户恢复上传时,我们可以检查 chunks 字段,查看哪些块已上传,哪些块尚未上传。然后,我们可以开始上传尚未上传的块。这样,即使用户断网或关闭浏览器,也无需从头开始上传。
// for example
{
  "id": "123",
  "name": "file.txt",
  "size": 1000,
  "mimeType": "text/plain",
  "uploadedBy": "user1",
  "status": "uploading",
  "chunks": [
    {
      "id": "chunk1",
      "status": "uploaded"
    },
    {
      "id": "chunk2",
      "status": "uploading"
    },
    {
      "id": "chunk3",
      "status": "not-uploaded"
    }
  ]
}
But how should we ensure this chunks field is kept in sync with the actual chunks that have been uploaded? 我们应该如何确保这个块字段与已上传的实际块保持同步呢?
A better approach is to use S3 event notifications to keep the chunks field in sync with the actual chunks that have been uploaded. S3 event notifications are a feature of S3 that allow you to trigger a Lambda function or send a message to an SNS topic when a file is uploaded to S3. We can use this feature to send a message to our backend when a chunk is successfully uploaded and then update the chunks field in the FileMetadata table without relying on the client.
- 更好的方法是使用 S3 事件通知. 使“chunks”字段与已上传的实际数据块保持同步。
- S3 事件通知是 S3 的一项功能,允许您在文件上传到 S3 时触发 Lambda 函数或向 SNS 主题发送消息。
- �我们可以利用此功能在数据块成功上传后向后端发送消息,然后更新 FileMetadata 表中的“chunks”字段,而无需依赖客户端。
工程实践中建议采用 双通道更新机制:
- 客户端上传成功后 -> 主动调用 API
POST /files/{fileId}/chunks/{chunkIndex}/complete - 后端通过 S3 Event 再做一致性补偿 Consistency Compensation to check one more time
Next, let's talk about how to uniquely identify a file and a chunk. When you try to resume an upload, the very first question that should be asked is:
- (1) Have I tried to upload this file before? 我之前尝试过上传这个文件吗
- (2) If yes, which chunks have I already uploaded? 我已经上传了哪些数据块
What is a fingerprint? 什么是指纹
A fingerprint is a mathematical calculation that generates a unique hash value based on the content of the file. This hash value, often created using cryptographic hash functions like SHA-256, serves as a robust and unique identifier for the file regardless of its name or the source of the upload. By computing this fingerprint, we can efficiently determine whether the file, or any portion of it, has been uploaded before.
指纹是一种数学计算方法,它根据文件内容生成一个唯一的哈希值。该哈希值通常使用 SHA-256 等加密哈希函数创建,无论文件名称或上传来源如何,它都可以作为文件的唯一可靠标识符。通过计算此指纹,我们可以有效地确定该文件或其任何部分是否曾被上传过。
For resumable uploads, the process involves not only fingerprinting the entire file but also generating fingerprints for each individual chunk. This chunk-level fingerprinting allows the system to precisely identify which parts of the file have already been transmitted.
- 对于可续传上传,该过程不仅涉及对整个文件进行指纹识别,还涉及为每个单独的块生成指纹。
- 这种块级指纹识别使系统能够精确识别文件哪些部分已经传输。
- checksum 关注“内容是否损坏”
- fingerprint 关注“内容是否相同”
核心链路 - 当用户上传大文件时
- 1.客户端文件分片与指纹计算
- 客户端将大文件切分为多个 5–10MB 的块 (chunk)
- 计算每个 chunk 的指纹,以及整个文件的指纹作为唯一标识 (fileId)
- 2.检查文件是否已上传
- 客户端根据 fileId 查询后端
- 若文件已存在且未完成上传,则进入断点续传流程;否则初始化新上传任务
- 3.初始化上传任务
- 后端记录文件元数据与所有 chunk 的初始状态 (未上传)
- 返回客户端所需的上传信息 (如每个 chunk 的上传凭证)
- 4.客户端上传每个 chunk
- 客户端逐个或并发上传 chunk
- 每个 chunk 上传成功后,触发回调或通知后端更新上传状态
- 5.后端追踪状态并完成上传
- 后端更新对应 chunk 状态为“已上传”
- 当所有 chunk 块上传完成后,标记整个文件为“已完成”
- 客户端根据状态实时展示上传进度,并支持中断续传
7.2 How can we make uploads, downloads, and syncing as fast as possible? 如何才能让上传、下载和同步尽可能快?
- To recap, for download we used a CDN to cache the file closer to the user. This made it so that the file doesn't have to travel as far to get to the user, reducing latency and speeding up download times.
- 对于下载,我们使用了 CDN 将文件缓存在更靠近用户的位置。这样,文件到达用户手中就无需经过太远的传输,从而降低了延迟并加快了下载速度。
- For upload, chunking, beyond being useful for resumable uploads, also plays a significant role in speeding up the upload process. While bandwidth is fixed (put another way, the pipe is only so big), we can use chunking to make the most of the bandwidth we have.
- 对于上传,分块除了有助于断点续传之外,在加快上传速度方面也发挥着重要作用。虽然带宽是固定的 (换句话说,管道是有限的),但我们可以使用分块来最大限度地利用现有带宽。
we can also utilize compression to speed up both uploads and downloads. Compression reduces the size of the file, which means fewer bytes need to be transferred. We can compress a file on the client before uploading it and then decompress it on the server after it's uploaded. We can also compress the file on the server before sending it to the client and then rely on the client to decompress it.
我们还可以利用压缩来加快上传和下载速度 。压缩可以减小文件大小,这意味着需要传输的字节数更少。我们可以在客户端上传文件之前对其进行压缩,然后在上传完成后在服务器上对其进行解压。我们也可以在将文件发送到客户端之前在服务器上对其进行压缩,然后依靠客户端对其进行解压。
- Text 文本类文件 (.txt, .json, .csv 等)
- 压缩比高,适合压缩处理。通常可从数 GB 压缩到显著更小的体积,推荐在上传前进行压缩以减少传输时间。
- Media 媒体文件 (.png, .jpg, .mp4, .mp3 等)
- 已采用压缩编码,进一步压缩空间有限。压缩处理开销大于带宽节省,不建议进行二次压缩。
- Document and archive 文档类与归档文件 (.pdf, .docx, .zip, .tar.gz 等)
- 部分内容可能已压缩。压缩收益依赖实际内容,建议在客户端评估压缩率后再决定是否压缩。
Compression Algorithms 压缩算法
There are a number of compression algorithms that you can use to compress files. The most common are Gzip, Brotli, and Zstandard. Each of these algorithms has its own tradeoffs in terms of compression ratio and speed. Gzip is the most widely used and is supported by all modern web browsers. Brotli is newer and has a higher compression ratio than Gzip, but it's not supported by all web browsers. Zstandard is the newest and has the highest compression ratio and speed, but it's not supported by all web browsers. You'll need to decide which algorithm to use based on your specific use case.
您可以使用多种压缩算法来压缩文件。最常见的是 Gzip 、 Brotli 和 Zstandard 。每种算法在压缩率和速度方面都有各自的优缺点。Gzip 是使用最广泛的算法,所有现代 Web 浏览器都支持它。Brotli 较新,压缩率比 Gzip 高,但并非所有 Web 浏览器都支持它。Zstandard 是最新的算法,具有最高的压缩率和速度,但并非所有 Web 浏览器都支持它。您需要根据具体用例来决定使用哪种算法。
7.3 How can you ensure file security? 如何保证文件安全
Security is a critical aspect of any file storage system. We need to ensure that files are secure and only accessible to authorized users. 安全性是任何文件存储系统的关键要素。我们需要确保文件安全,并且只有授权用户才能访问。
- Encryption in Transit 传输中加密
- We should use HTTPS to encrypt the data as it's transferred between the client and the server. This is standard practice and is supported by all modern web browsers. 我们应该使用 HTTPS 加密客户端和服务器之间传输的数据。
- Encryption at Rest 静态加密
- We should also encrypt the files when they are stored in S3. This is a feature of S3 and is easy to enable. When a file is uploaded to S3, we can specify that it should be encrypted. S3 will then encrypt the file using a unique key and store the key separately from the file. This way, even if someone gains access to the file, they won't be able to decrypt it without the key.
- 当文件存储在 S3 中时,我们也应该对其进行加密。这是 S3 的一项功能,并且易于启用。当文件上传到 S3 时,我们可以指定对其进行加密。S3 会使用唯一密钥对文件进行加密,并将密钥与文件分开存储。这样,即使有人获得了文件的访问权限,他们也无法在没有密钥的情况下解密。您可以点击此处了解更多关于 S3 加密的信息。
- Access Control 访问控制
- Our shareList or separate share table/cache is our basic ACL. As discussed earlier, we make sure that we share download links only with authorized users.
- 我们确保只与授权用户共享下载链接。
But what happens if an authorized user shares a download link with an unauthorized user? For example, an authorized user may, intentionally or unintentionally, post a download link to a public forum or social media and we need to make sure that unauthorized users cannot download the file. 但是,如果授权用户与未授权用户共享下载链接,会发生什么情况?例如,授权用户可能会有意或无意地将下载链接发布到公共论坛或社交媒体,我们需要确保未授权用户无法下载该文件。
解决方案 - 签名 URL (Signed URL)+ 有效期控制
当用户要下载一个文件时,系统不会直接给他一个永久下载地址,而是:
- 动态生成一个签名 URL (临时链接)
- 包含:文件路径 + 过期时间戳 + 可能还有 IP 等限制
- 服务器用一个“只有自己知道的密钥”来加密生成签名
- 发送给用户
- 用户用这个临时链接可以访问 CDN 或 S3 上的文件,比如这个链接只在 5 分钟内有效。
- CDN 或 S3 验证签名 URL
- 当用户通过这个链接下载时,CDN/S3 会校验
- AuthZ and decode token like JWT ->
"scopes": ["read:file", "write:file", "share:file", ...] - 时间戳是不是已经过期?
- AuthZ and decode token like JWT ->
- 如果校验通过,就让你下载;
- 如果签名错了或时间过了,就拒绝访问。
- 当用户通过这个链接下载时,CDN/S3 会校验
16 Design Tinder
Understanding the Problem
Step 1. Functional Requirements
Step 2. Non-functional Requirements
Step 3. Core Entities
Step 7. Deep Dives and Best Solutions
17 Design Leetcode
For the sake of this problem (and most system design problems for what it's worth), we can assume that users are already authenticated and that we have their user ID stored in the session or JWT.
为了解决这个问题 (以及大多数系统设计问题),我们可以假设用户已经通过身份验证,并且我��们已将他们的用户 ID 存储在会话或 JWT 中。
Step 1. Functional Requirements
- Users should be able to view a list of coding problems. 用户应该能够查看编码问题列表。
- Users should be able to view a given problem, code a solution in multiple languages. 用户应该能够查看给定的问题,并用多种语言编写解决方案。
- Users should be able to submit their solution and get instant feedback. 用户应该能够提交他们的解决方案并获得即时反馈。
- Users should be able to view a live leaderboard for competitions. 用户应该能够查看比赛的实时排行榜。
Step 2. Non-functional Requirements
- The system should prioritize availability over consistency. 系统应该优先考虑可用性而不是一致性。
- The system should support isolation and security when running user code. 系统在运行用户代码时应该支持隔离和安全性。
- The system should return submission results within 5 seconds. 系统应在5秒内返回提交结果。
- The system should scale to support competitions with 100,000 users. 该系统应可扩展以支持 100,000 名用户的竞赛。
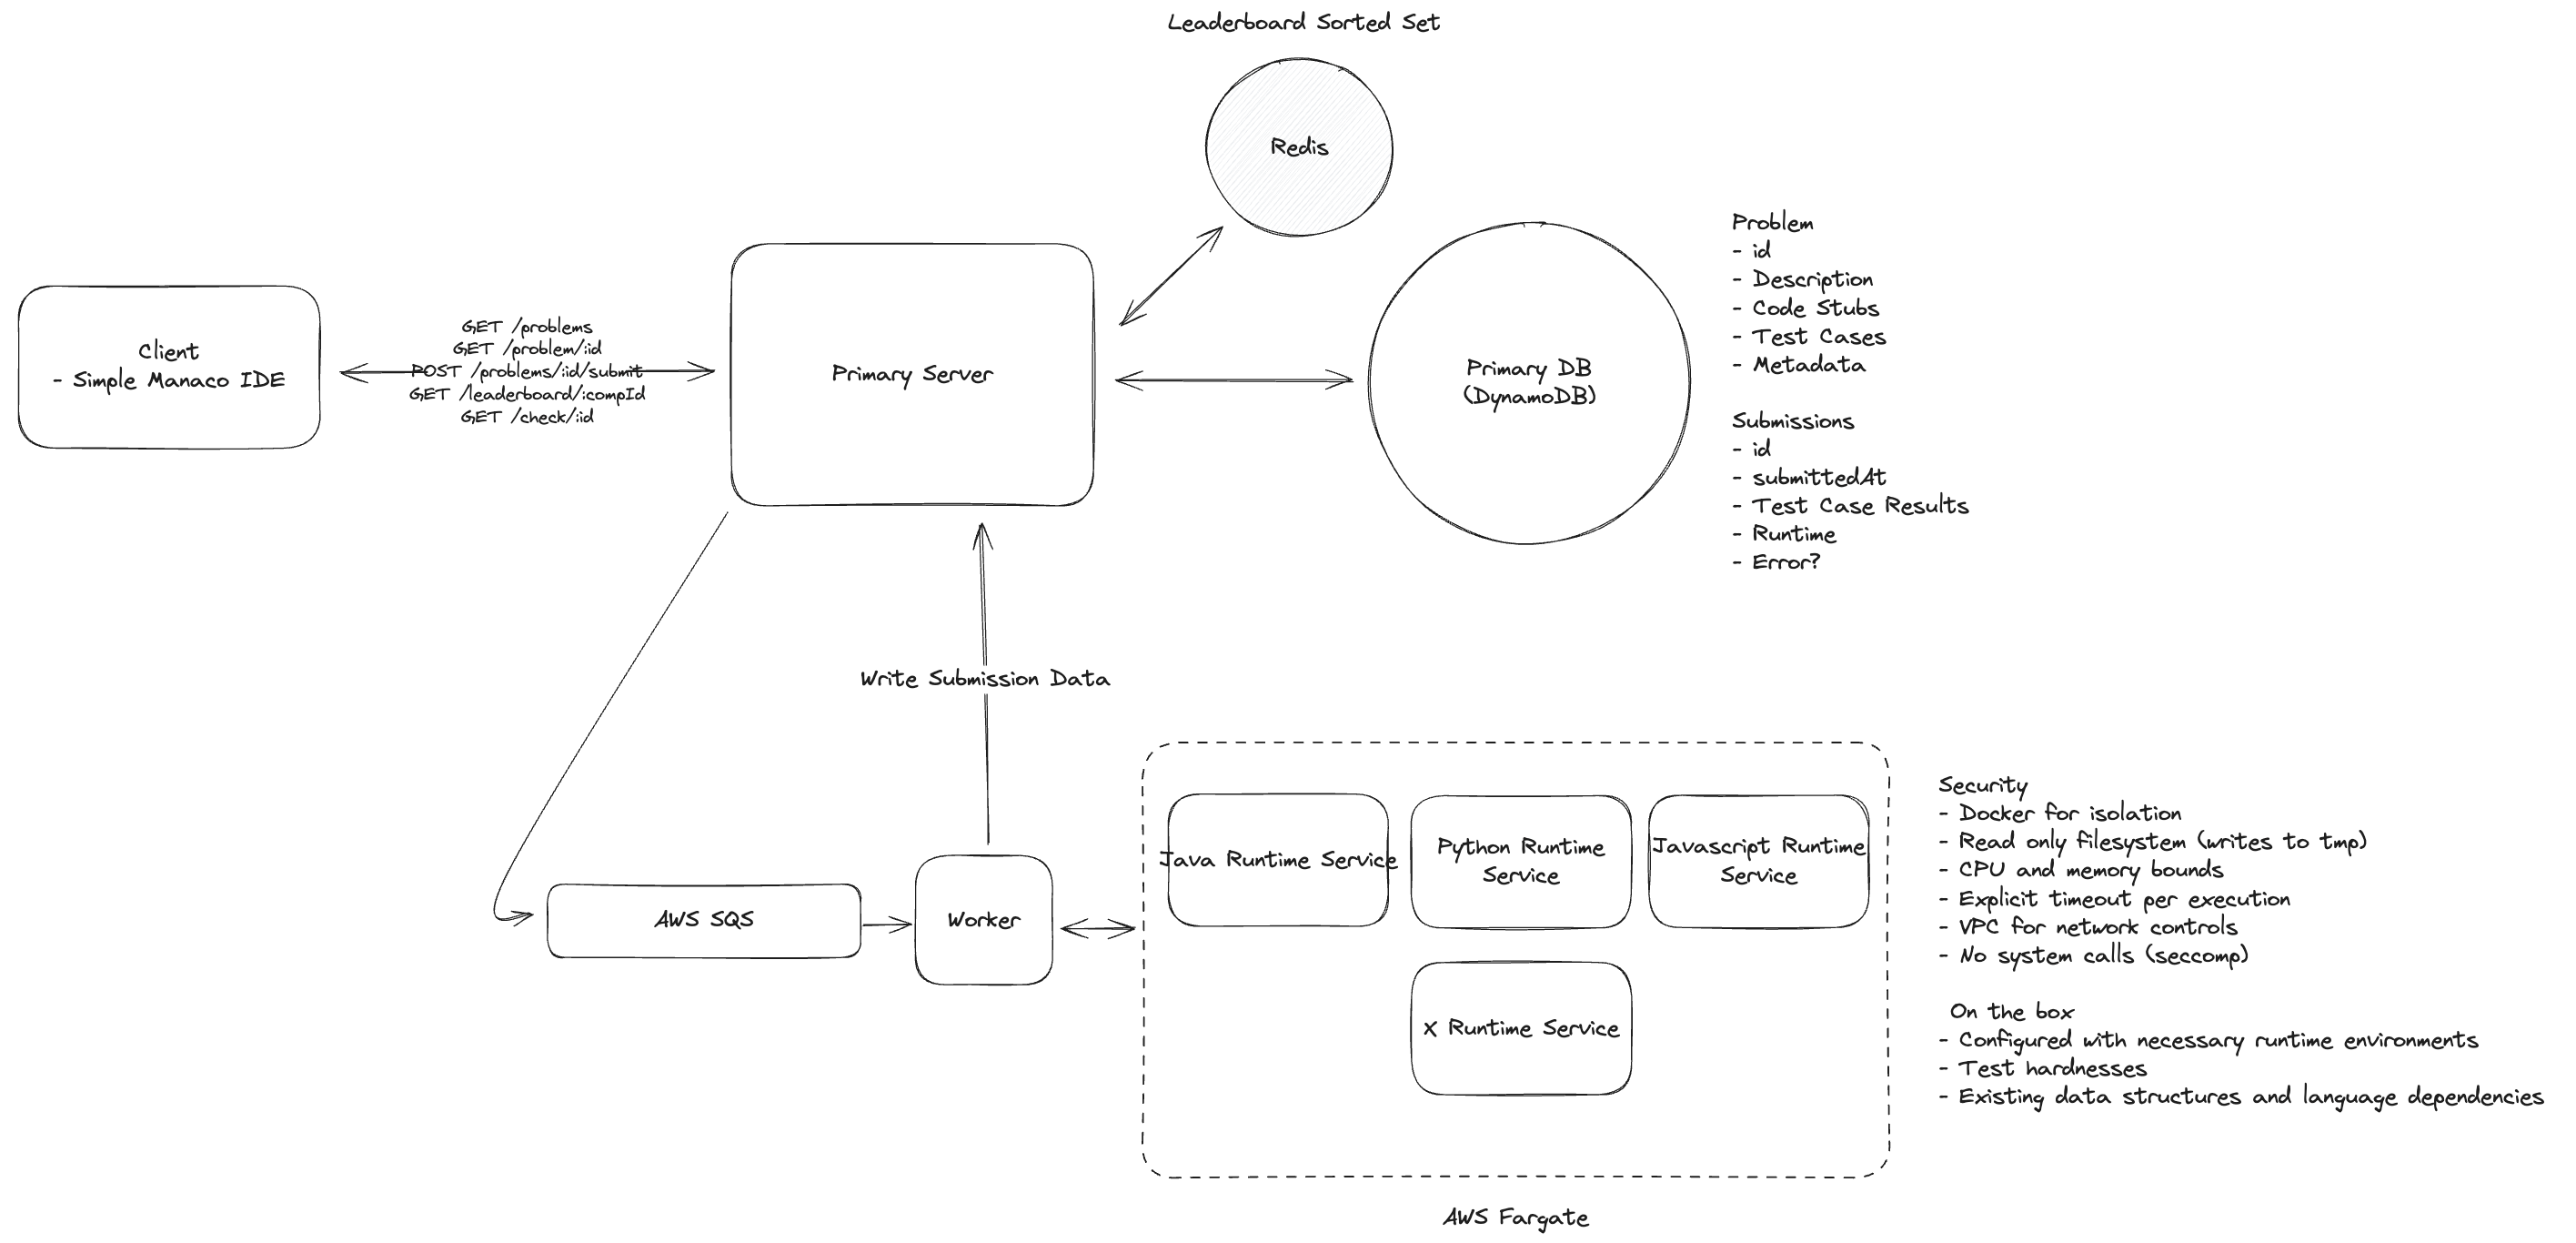
Step 3. Core Entities
- Problem
Id, title, tags[], timelimit, memorylimit, difficulty, test_case_id_list, is_active
- Submission
Id, user_id, problem_id, code, language, status (Pending / Accepted / Wrong Answer / TLE / Runtime Error)Score, runtime_duration, avg_memory_usage
- Leaderboard/rank board
Id, competition_id, user_id, score, submit_count, last_submit_time- Type:
weekly_competition, ...
- TestCase
Id, input(json), expected_output(json), is_hidden
- TestResult
Id, test_case_id, status, runtime, memory
Step 7. Deep Dives and Best Solutions
7.1 How will the system support isolation and security when running user code? 运行用户代码时系统如何支持隔离和安全
By running our code in an isolated container, we've already taken a big step towards ensuring security and isolation. But there are a few things we'll want to include in our container setup to further enhance security: 通过在隔离容器中运行代码,我们已经在确保安全性和隔离性方面迈出了一大步。但为了进一步增强安全性,我们还需要在容器设置中添加一些内容
- Read Only Filesystem 只读文件系统
- CPU and Memory Bounds CPU 和内存限制
- Explicit Timeout 显式超时
- Limit Network Access 限制网络访问
- No System Calls 禁止系统调用
7.2 How would you make fetching the leaderboard more efficient? 如何才能更高效地获取排行榜
Redis Sorted Set 数据结构
Redis Sorted Set 是 Redis 中的一种核心数据结构,简称 ZSet. 它结合了 Set 的唯一性 和 有序集合的排序特性,是排行榜类场景的常用选择。
- 内部使用 跳表 (Skip List)+ HashMap 实现
- HashMap:用于快速定位元素是否存在
- 跳表:用于快速查找前 N 名、按顺序遍历
- 每个元素由 一个字符串成员 (member)+ 一个浮点型分数 (score) 构成
- Redis 会根据 score 对元素进行自动排序
- ZADD: 添加元素
- ZINCRBY: 增加元素分数
- ZREM: 移除元素
- ZREVRANGE: 从高到低取前 N 个元素
- ZRANK / ZREVRANK: 获取成员的排名
核心链路 - Redis Sorted Set with Periodic Polling
- 1.使用 Redis Sorted Set 存储实时排行榜
- 每场比赛维护一个排行榜键,例如 ->
competition:leaderboard:{competitionId} - 用户得分作为 score,userId 作为 value,用命令
ZADD competition:leaderboard:{competitionId} {score} {userId}写入
- 每场比赛维护一个排行榜键,例如 ->
- 2.查询排行榜时
- 客户端每 5 秒轮询一次,例如请求 ->
GET /competitions/:competitionId/leaderboard?top=100 - 使用 Redis 命令快速取前 N 名 ->
ZREVRANGE competition:leaderboard:{competitionId} 0 N-1 WITHSCORES
- 客户端每 5 秒轮询一次,例如请求 ->
- 3.数据更新流程
- 每次提交评测完成 → 更新数据库结果 + 更新 Redis 排行榜
7.3 How would the system scale to support competitions with 100,000 users? 系统如何扩展以支持100,000名用户的比赛
The main concern here is that we get a sudden spike in traffic, say from a competition or a popular problem, that could overwhelm the containers running the user code. The reality is that 100k is still not a lot of users, and our API server, via horizontal scaling, should be able to handle this load without any issues. However, given code execution is CPU intensive, we need to be careful about how we manage the containers.
这里主要担心的是,流量可能会突然激增,比如来自比赛或热门问题,这可能会让运行用户代码的容器不堪重负。事实上,10 万用户仍然不算多,我们的 API 服务器通过水平扩展应该能够轻松处理这样的负载。然而,由于代码执行需要消耗大量的 CPU 资源,我们需要谨慎管理容器。
核心链路 - Scaling with Queue
- 1.用户提交代码 → API Server 接收请求
- 2.API Server 将提交任务放入消息队列 (如 AWS SQS)
- 3.后端容器 (评测 worker)从队列中拉取任务,执行代码运行和比对
- 4.结果写入数据库 + 更新缓存
- 5.客户端通过轮询接口
GET /check/:id获取运行结果
If we require users to register for competitions, we would have a good sense of when to expect peak traffic and could scale up the containers in advance.
如果我们要求用户注册参加比赛,我们就能很好地了解何时会出现流量高峰,并可以提前扩大容器的规模。
7.4 How would the system handle test cases for running? 系统如何处理用于运行的测试用例
- Need a standard way to serialize the input and output of each test case and for each language.
- 需要一种标准方法来序列化每个测试用例和每种语言的输入和输出。
- They can deserialize these inputs, pass them to the user's code, and compare the output to the deserialized expected output.
- 他们可以反序列化这些输入,将它们传递给用户的代码,并将输出与反序列化的预期输出进行比较。
- In this case, we only need to maintain special serialization methods for specific data structures, such as trees, linked lists, and graphs.
- 在这种情况下,我们只需要为特定的数据结构维护特殊的序列化方法,例如树、链表和图。
// We maintain unified test cases in JSON format, for example.
{
  "id": 1,
  "title": "Max Depth of Binary Tree",
  ...
  "testCases": [
    {
      "type": "tree",
      "input": [3,9,20,null,null,15,7],
      "output": 3
    },
    {
      "type": "tree",
      "input": [1,null,2],
      "output": 2
    }
  ]
}
21 Design a Job Scheduler
Understanding the Problem
What is a Job Scheduler
A job scheduler is a program that automatically schedules and executes jobs at specified times or intervals. It is used to automate repetitive tasks, run scheduled maintenance, or execute batch processes.
作业调度程序是一个自动安排并在指定时间或间隔执行作业的程序。它用于自动执行重复性任务、运行计划维护或执行批处理。
- Task: A task is the abstract concept of work to be done. For example, "send an email". Tasks are reusable and can be executed multiple times by different jobs.
- 任务是待完成工作的抽象概念。例如,“发送一封电子邮件”。任务可重用,可以由不同的作业多次执行。
- Job: A job is an instance of a task. It is made up of the task to be executed, the schedule for when the task should be executed, and parameters needed to execute the task. For example, if the task is "send an email" then a job could be "send an email to john@example.com at 10:00 AM Friday".
- 作业是任务的一个实例。它由待执行的任务、任务执行时间表以及执行任务所需的参数组成。例如,如果任务是“发送电子邮件”,那么作业可以是“于周五上午 10:00 向 john@example.com 发送电子邮件”。
Step 1. Functional Requirements
- Users should be able to schedule jobs to be executed immediately, at a future date, or on a recurring schedule (ie. "every day at 10:00 AM").
- 用户应该�能够安排立即执行、在未来某个日期执行或按照重复计划执行 (即“每天上午 10:00”)。
- Users should be able monitor the status of their jobs.
- 用户应该能够监控他们的工作状态。
- Users should be able to cancel or reschedule jobs.
- 用户应该能够取消或重新安排工作。
Step 2. Non-functional Requirements
- The system should be highly available
- availability > consistency
- The system should execute jobs within 2sof their scheduled time.
- 系统应在预定时间的 2 秒内执行作业。
- The system should be scalable to support up to 10k jobs per second.
- 该系统应具有可扩展性,以支持每秒最多 10k 个作业。
- The system should ensure at-least-once execution of jobs.
- 系统应确保作业至少执行一次。
Step 3. Core Entities
- Task
- Represents a task to be executed. 要执行的任务
- Job
- Represents an instance of a task to be executed at a given time with a given set of parameters. 要在给定时间以给定参数执行的任务实例。
- Schedule
- Represents the schedule for when a job should be executed. 表示作业应何时执行的计划。
- User
- Represents a user who can schedule jobs and view the status of their jobs. 表示可以安排作业并查看其状态的用户。
Step 4. APIs
- Create a Job
- Endpoint:
POST /jobs - Request Body:
{
  "task": "send_email",
  "schedule": "0 10 * * *",
  "params": {
    "to": "john@example.com",
    "subject": "Daily Report",
    "body": "Here is your daily report..."
  }
}- Response:
{
  "jobId": "12345",
  "status": "scheduled"
} - Endpoint:
- Query Job Status by Job ID
- Endpoint:
GET /jobs/{jobId} - Response:
{
  "jobId": "12345",
  "status": "scheduled"
} - Endpoint:
- Query Job Status by User ID
- Endpoint:
GET /jobs?user_id={user_id}&status={status}&start_time={start_time}&end_time={end_time} -> Job[] - Response:
[
  {
    "jobId": "12345",
    "start_time": "2023-09-01T10:00:00Z",
    "end_time": "2023-10-01T10:00:00Z",
    "status": "scheduled"
  },
  {
    "jobId": "67890",
    "start_time": "2023-09-01T11:00:00Z",
    "end_time": "2023-10-01T11:00:00Z",
    "status": "completed"
  }
] - Endpoint:
Step 7. Deep Dives and Best Solutions
7.1 Users should be able to schedule jobs to be executed immediately, at a future date, or on a recurring schedule 用户应该能够安排立即执行、在未来某个日期执行或按重复计划执行的作业
当用户安排作业时,他们会提供要执行的任务、作业的执行时间表以及执行任务所需的参数。
- The user makes a request to a
/jobsendpoint with the following payload:
{
  "task": "send_email",
  "schedule": "0 10 * * *",
  "params": {
    "to": "john@example.com",
    "subject": "Daily Report",
    "body": "Here is your daily report..."
  }
}
- We store the job in our database with a status of
PENDING. This ensures that- We have a persistent record of all jobs. 我们有所有工作的持久记录
- We can recover jobs if our system crashes. 如果系统崩溃,我们可以恢复工作
- We can track the status of jobs throughout their lifecycle. 我们可以在整个生命周期内跟踪作业的状态
对于一次性任务来说,这种方法很有效,但考虑到周期性任务,这种方法就失效了。
假设有一份需要每天上午 10 点运行的每日电子邮件报告。我们可以将 CRON 表达式 0 10 * * * 存储在表中,但如何高效地找到接下来几分钟需要运行的任务呢?我们需要对数据库中的每一个 CRON 表达式进行求值——这显然不可扩展。
这给我们带来了一个关键的洞察:我们需要将作业的定义与其执行实例分开。 可以把它想象成一个日历 -> 你可能有一个每周一重复的事件,但在日历应用中,你在每个星期一都会看到该事件的单独实例。
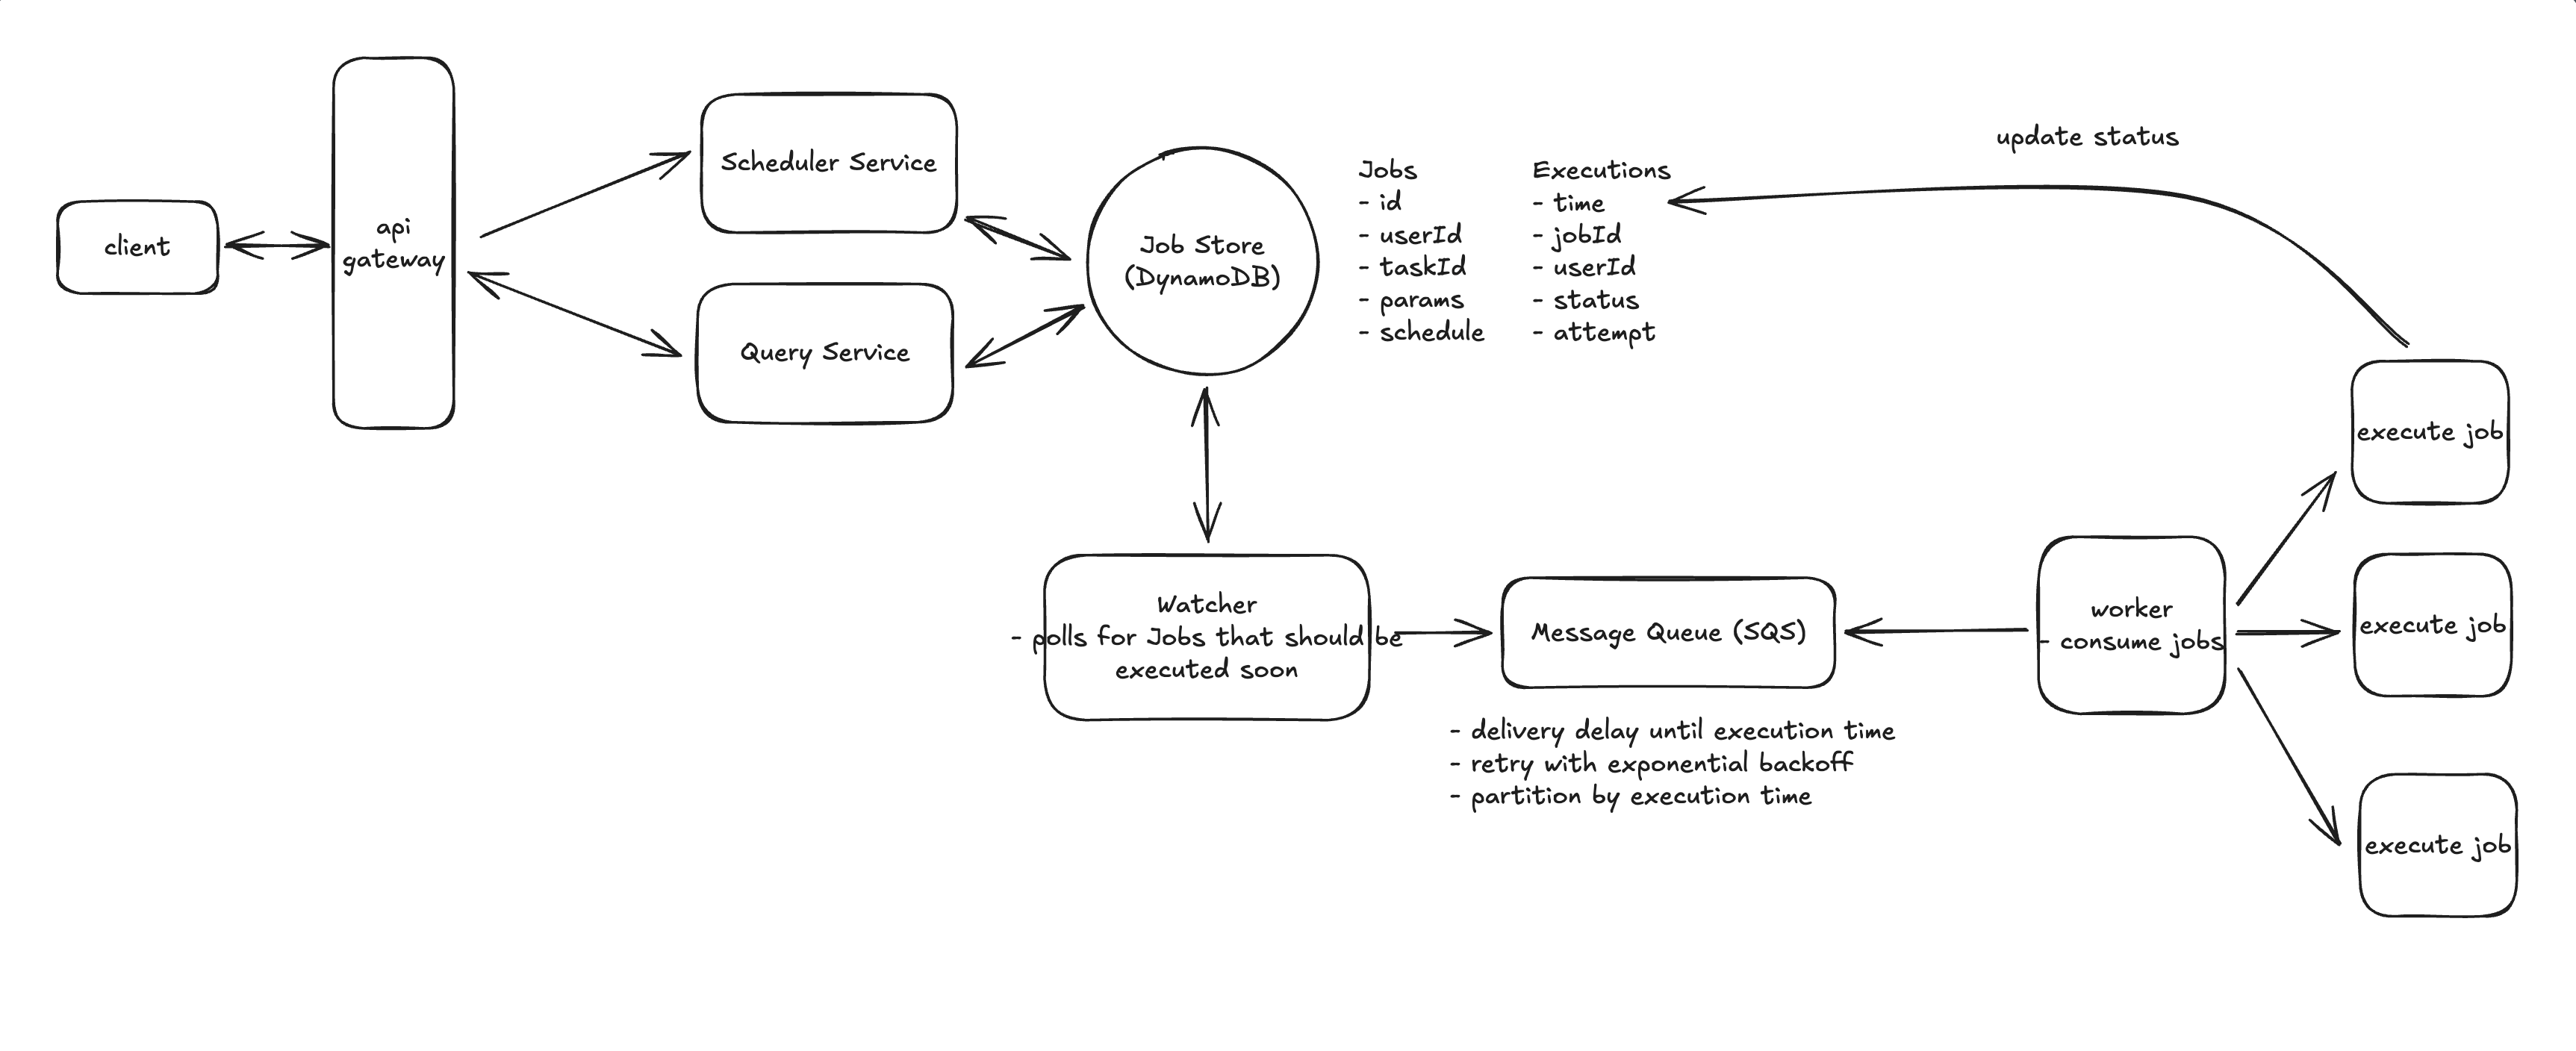
我们将数据拆分成两个表。首先,Jobs 表存储了职位定义
// Jobs table
{
  "job_id": "123e4567-e89b-12d3-a456-426614174000",  // Partition key for easy lookup by job_id
  "user_id": "user_123",
  "task_id": "send_email",
  "schedule": {
    "type": "CRON" | "DATE"
    "expression": "0 10 * * *"  // Every day at 10:00 AM for CRON, specific date for DATE
  },
  "parameters": {
    "to": "john@example.com",
    "subject": "Daily Report"
  }
}
我们的 Executions 表跟踪每次作业运行的时间
// Executions table
{
  "time_bucket": 1715547600,  // Partition key (Unix timestamp rounded down to hour)
  "execution_time": "1715548800-123e4567-e89b-12d3-a456-426614174000",  // Sort key (exact execution time and the jobId since partition key and sort key must be unique)
  "job_id": "123e4567-e89b-12d3-a456-426614174000",
  "user_id": "user_123",
  "status": "PENDING",
  "attempt": 0
}
通过使用时间段 (Unix 时间戳向下舍入到最接近的小时数)作为分区键,我们可以实现高效查询,同时避免热分区问题。例如,要查找接下来几分钟内需�要运行的作业,我们只需查询当前小时的时间段,并可能查询下一个小时的时间段。时间段的计算方法很简单
time_bucket = (execution_time // 3600) * 3600 # Round down to nearest hour
首先,通过仅查询 1-2 个分区 来查找即将执行的作业,我们保持了高效的读取操作。小时存储桶确保作业在各个分区之间均匀分布,从而避免出现热点。其次,当重复执行的作业完成后,我们可以通过计算下一次执��行时间并在 Executions 表中创建新条目来轻松安排其下一次执行。作业定义保持不变,但我们会不断创建新的执行实例。
核心链路 - 用户创建作业
- 1.用户创建作业 → API Server 接收请求
- 2.API Server 将作业定义写入数据库 (Jobs 表),并把调度信息放入消息队列
- 3.Scheduler 从队列拉取任务,解析 CRON/DATE/IMMEDIATE,生成执行实例 (Executions 表,状态 PENDING)
- 4.Dispatcher 定时扫描当前/下一小时的执行实例,将需要运行的任务放入执行队列
- 5.Worker 从执行队列拉取任务,执行具体逻辑并更新执行状态 (SUCCEEDED/FAILED)
- 6.客户端通过
GET /jobs/:id或GET /executions/:id查询执行结果 (可选 Webhook 推送)
7.2 Users should be able monitor the status of their jobs. 用户应该能够监控他们的工作状态
Executions 表任务状态定义
PENDING: 作业已创建,但尚未执行IN_PROGRESS: 作业正在执行中RETRYING: 作业正在重试中SUCCEEDED: 作业成功完成FAILED: 作业执行失败
为了加速查找效率,我们可以为 Executions 表创建 Global Secondary Index (GSI) 全局二级索引
- Partition Key:
user_id - Sort Key:
execution_time+job_id
// Executions GSI (user-status-index)
{
  "user_id": "user_123",
  "status": "PENDING",
  "execution_time": 1715548800,
  "job_id": "123e4567-e89b-12d3-a456-426614174000"
}
通过为 user_id 和 execution_time + job_id 创建 GSI,我们可以快速查询特定用户的所有作业执行状态。这使得监控和管理作业变得更加高效。
aws dynamodb query \
--table-name Executions \
--index-name user-status-index \
--key-condition-expression "user_id = :uid" \
--expression-attribute-values '{":uid": {"S": "user_123"}}' \
--limit 20
| 特性 | MySQL 索引 | DynamoDB GSI |
|---|---|---|
| 存储 | B+Tree 指针结构,依赖主表 | 独立索引表,复制部分字段 |
| 一致性 | 强一致 | 最终一致 (可能延迟) |
| 写入开销 | 更新索引结构 (额外 IO) | 多一次写请求 (主表 + 索引表) |
| 查询灵活度 | 支持复杂 SQL 语法、优化器选择是否走 | 只能按 PK/SK 查询,语法受限 |
| 本质 | “查找加速器” | “另一张表的视图” |
7.3 How can we ensure the system executes jobs within 2s of their scheduled time? 如何确保系统在预定时间的2秒内执行作业
The single, most obvious, limitation is that we are querying the database every few minutes to find jobs that are due for execution. The frequency with which we decide to run our cron that queries for upcoming jobs is naturally the upper bound of how often we can be executing jobs. If we ran the cron every 2 minutes, then a job could be executed as much as 2 minutes early or late.
最明显的限制是我们每隔几分钟就要查询一次数据库,查找即将执行的作业。我们决定运行 cron 查询即将执行的作业的频率自然就是我们执行作业频率的上限。如果我们每 2 分钟运行一次 cron,那么作业的执行时间可能会提前或推迟 2 分钟。
我们可以更巧妙地引入一个双层调度架构,将持久性和精确性结合起来。
- Phase 1: Query the database: Just like in our current design, we will query the
Executionstable for jobs that are due for execution in the next ~5 minutes (leaving some buffer for network latency, etc.).- 阶段 1 -> 查询数据库就像我们当前的设计一样,我们将查询执行表以查找接下来约 5 分钟内要执行的作业
- Phase 2: Delayed Message Queue: We'll take the list of jobs returned by our query and push them to a message queue, ordered by
execution_time. Workers will then pull jobs from the queue in order and execute the job.- 阶段 2 -> 查询到的任务会按照
execution_time排序,推送到一个支持 基于时间调度 / 延迟投递的消息队列 (例如 RabbitMQ 延迟交换机、Redis ZSet、Kafka 时间轮)。这样,任务会在到期的精确时间点出队,Worker 再从延迟队列中拉取并执行。
- 阶段 2 -> 查询到的任务会按照
方案1 RabbitMQ + x-delayed-message 插件
使用 rabbitmq_delayed_message_exchange 插件,消息生产时带上 x-delay 毫秒参数。消息会在延迟时间到后才进入队列,可被消费。
发送消息
{
  "routing_key": "ready",
  "payload": "{\"job_id\":\"123\",\"execute_at\":1715548800000}",
  "properties": {
    "headers": {
      "x-delay": 2000   // 延迟 2000 毫秒后投递
    }
  }
}
方案2 Redis ZSET 延迟队列
利用 ZSet 存储延迟任务 score = 执行时间戳(ms)。定时从 ZSet 中取出到期任务执行。
插入任务
# job_id=123,计划执行时间=1715548800123 (ms)
ZADD z:delay 1715548800123 '{"job_id":"123","task":"send_email"}'
取出到期任务 - Lua 脚本示例
-- KEYS[1]=z:delay, ARGV[1]=now_ms, ARGV[2]=limit
local due = redis.call('ZRANGEBYSCORE', KEYS[1], '-inf', ARGV[1], 'LIMIT', 0, ARGV[2])
for i,v in ipairs(due) do
  redis.call('ZREM', KEYS[1], v)
end
return due
自定义 Worker 周期轮询 Lua
- 每 200–500ms 执行一次 Lua 脚本,批量取出到期任务。
- 消费成功 -> 处理并写结果库。
- 消费失败 -> 可重新 ZADD 回队列,或放入失败队列。
可扩展点
- 多分片 ->
z:delay:{shard}避免单点热点。 - 可见性超时 -> 配合
z:processingZSet 存储正在执行的任务,超时回滚。 - 更可靠 -> 到期任务转入
LPUSH q:ready或XADD stream:ready,由 Worker 消费。
什么是 可见性超时 Visibility Timeout?
当一个 Worker 从队列取出一条消息 时,这条消息会暂时对其他 Worker “不可见”,进入一个 超时时间窗口 (比如 30 秒)。
- 如果 Worker 在超时内成功处理并确认 ack,消息就被真正删除。
- 如果 Worker 挂了/处理失败/没有 ack��,等超时结束后,这条消息会重新变得“可见”,可以被别的 Worker 再次消费。
7.4 How can we ensure the system is scalable to support up to 10k jobs per second? 我们如何确保系统可扩展以支持每秒高达 10k 个作业
任务创建阶段 Job Creation
- 1.接受请求
POST /jobs: 必须带client_request_idas 幂等键.- 速率限制: 租户级 token-bucket (例如 2k/s/tenant,上限 10k/s 总量)。
- 校验: JSON Schema + CRON/DATE 校验,payload ≤ 1KB (大参数放对象存储,MQ 里只传指针)。
- 2.插入DB Transaction
- Jobs 表: 保存任务定义 (如果存在则更新,不存在则插入)
- Executions 表: 生成一个执行实例,状态初始为 PENDING,带上 execution_id 和 due_at (执行时间)。
- 事件日志表 EventLog/Outbox: 插入一条记录,表示“这个任务需要发消息到 MQ”,以保证即使 MQ 投递失败,也能由后续的 Outbox Relay 进程补发。
- 事务保证这三步要么一起成功,要么一起失败,避免数据和 MQ 不一致。
- 单事务内 3次写入 -> 首先确保是同一DB集群 -> 使用统一分区键 (like
tenant_id + region) 来确保路由到同分区/分片 -> 从而避免了分布式事务。
- 3.Job Scheduling into 延迟队列
- 如果任务的执行时间 ≤5 分钟,就直接同步投递到 MQ (延迟队列)。
- 投递失败时不重试阻塞用户请求,而是依赖 Outbox Relay 后续补偿。
- 4.Response
- 接口返回 202 Accepted,表示任务已经创建成功.
Response {job_id, execution_id}
- 接口返回 202 Accepted,表示任务已经创建成功.
运行时环境 Runtime
- Warm Pool:
- 常驻容器池,按语言/任务类型预热,比如 Python3/Node.js。命中率高,触发延迟
less than 200ms。 - 例如 AWS Lambda 的 provisioned concurrency、K8s 里的常驻 deployment、内部池化容器
- 常驻容器池,按语言/任务类型预热,比如 Python3/Node.js。命中率高,触发延迟
- On-Demand:
- 拉起新容器,隔离强但冷启动 1–3s。
- 工业界用在低频/长耗时任务 (比如数据导出、模型训练),冷启动不是瓶颈。
- 混合:
- 短频快任务走池,长任务走按需。
- 例如 Airbnb 的 task system、Netflix 的 Titus、阿里巴巴 SchedulerX
7.5 How can we ensure at-least-once execution of jobs? 如何确保作业至少执行一次
Our main concern is how we process failures. If a worker fails to process a job for any reason, we want to ensure that the job is retried a reasonable number of times before giving up (let's say 3 retries per job).
我们主要关注的是如何处理故障。如果某个工作进程因任何原因未能处理某个作业,我们希望确保该作业在放弃之前重试合理的次数.
Visible failure 可见的故障
- The job fails visibly in some way. Most likely this is because of a bug in the task code or incorrect input parameters.
- 作业以某种方式明显失败。这很可能是由于任务代码中的错误或输入参数不正确造成的。
- 重试方式: 自动按配置进行重试 -> 更新状态为
RETRYING-> 重试多次失败后更新状态为FAILED-> 写入Executions表
Invisible failure 隐形故障
- The job fails invisibly. Most likely this means the worker itself went down.
- 作业隐形失败。这很可能意味着工作进程本身宕机了。
- 重试方式:
- Visibility Timeout 可见性超时 -> 例如,处理 5 分钟作业的工作进程可以每 15 秒延长一次可见性超时时间。这样,如果该工作进程崩溃,其他工作进程可以在 30 秒内接手该作业,而不必等待更长的超时时间到期。
- 心跳检测 -> 定期向系统发送心跳,表明工作进程仍在正常运行。如果心跳丢失,则认为工作进程已崩溃 -> 重启容器 or 更换工作进程。
22 Design QQ 个性签名
Step 1. Functional Requirements
- Update signature:用户更新个性签名 (文本/emoji),支持可见范围 (公开/好友/仅自己)。
- Broadcast change:向订阅者/好友广播“我更新了签名”的事件 (在线即时、离线稍后可见)。
- Read current:查看某用户当前签名。
- Read history:分页查看某用户签名历史;支持撤回/软删后不再对无权限用户展示。
- Privacy/Blocks:黑名单/拉黑后不接收对方广播,不可见其历史。
Step 2. Non-functional Requirements
- Traffic pattern:读>>写;写 P95
< 100ms;在线广播端到端< 1s。 - Availability:
>= 99.9%;同城多 AZ 容灾,跨地域读近写主或多主 (需冲突避免)。 - Consistency:写路径强一致 (当前值 + 历史 + 事件外盒同原子);读最终一致 (缓存/副本)。
- Scalability:支持千万 DAU;超级大号更新时限流+混合 fanout。
- Security:鉴权、ACL 校验、幂等、WAF/限速、数据加密 (静态/传输)。
Step 3. Core Entities
- User
{user_id, …} - Signature
- Current:
{user_id, content, visibility, version, updated_at, content_hash} - History:
{user_id, version, content, visibility, created_at, deleted}
- Current:
- FollowEdge
{follower_id, followee_id, state} - FeedEvent
{event_id, actor_id, version, created_at} - InboxItem
{viewer_id, event_id, actor_id, version, created_at} - Outbox (事务外盒)
{outbox_id, payload, status, created_at}
Step 4. APIs
POST /v1/signature:update
Body: { req_id, content, visibility }  // 幂等键 req_id
Resp: { user_id, version, updated_at }

GET /v1/signature/current?user_id=...
Resp: { user_id, content, visibility, version, updated_at }

GET /v1/signature/history?user_id=...&cursor=...&limit=20
Resp: { items:[{version, content, visibility, created_at}], next_cursor }

GET /v1/feed/updates?cursor=...&limit=20
Resp: { items:[{actor_id, version, created_at}], next_cursor }
- 错误码:RATE_LIMITED / CONTENT_BLOCKED / PERMISSION_DENIED / NOT_FOUND。
- 长连接消息 (WS):
signature_update{actor_id, version, ts}(客户端再拉正文)。
Step 5. Services
- API Gateway:鉴权、节流、灰度。
- Signature Service (Write/Read)
- 写:风控→去重(content_hash)→生成
version(雪花 ID)→同事务写current、history、outbox。 - 读:优先缓存 (Redis),miss 走只读库;二次 ACL 校验。
- 写:风控→去重(content_hash)→生成
- Outbox Dispatcher:可靠地把 outbox 投递到 Kafka/Pulsar (exactly-once 语义=幂等消费 + 去重)。
- Fanout Processor:消费
signature.update:- 查订阅与 ACL → 在线用户推 WS/移动推送;离线用户写 Inbox Service。
- 超级大号:切换或部分切换为 fanout-on-read。
- Inbox Service:维护 per-viewer 收件箱 (倒序 event_id 游标分页,TTL/配额)。
- Relationship Service:关注/好友/黑名单 (本地热点缓存 + Redis 二级缓存)。
Step 6. Storage
- DB (Master-Slave-Replica)
- 类型:分库分表的 SQL DB
current_signature(PK: user_id)——强一致单行更新。signature_history(PK: user_id, version DESC),二级索引created_at倒序。inbox_feed(PK: viewer_id, event_id DESC)。
- Cache (Redis/Memcache)
current_signature:{user}(TTL 30–120s + 事件失效);history_head:{user}最近 N 条;followees:{user}短 TTL;inbox_head:{viewer}页缓存。
- Queue/Log
- Kafka/Pulsar (topic:
signature.update,分区按 actor_id;另有 DLQ)。
- Kafka/Pulsar (topic:
- 对象/备份
- 历史冷数据归档 (S3/GCS);审计日志冷存。
- 索引 (可选)
- OpenSearch/ES (异步管道 + 撤回 tombstone)。
Step 7. Deep Dives and Best Solutions
7.1 写路径一致性 (事务 + 去重)
- 用户更新签名的时候,有三个动作要发生
- 写 current_signature 表 -> 当前签名要更新
- 写 signature_history 表 -> 历史要增加一条记录
- 广播事件 -> 要发消息到 Kafka → 推给粉丝
- 如果这三步不一致,就会出问题
- 如果只写了 DB 没发消息 → 粉丝收不到更新。
- 如果只发了消息没写 DB → 粉丝看到事件,但点进去却查不到内容。
- 如果 DB 写一半失败 → 历史有了但 current 没更新,用户界面混乱。
- 广播消息经常会因为网络抖动、重试机制导致重复投递。
- 为了保证 逻辑上只处理一次,需要给事件一个幂等键 (比如
user_id + version),消费者收到消息后,先查历史表是否存在该版本,存在就跳过。
所以必须要 保证三者的一致性。
7.2 Fanout 策略
- 默认 fanout-on-write:将事件写入每个 viewer 的
inbox_feed,读取快、写放大≈平均关注数。 - 超级大号 (粉丝>阈值)
- 标记为 hybrid: 只写事件流一次,不写所有 inbox;
- 粉丝在拉取 feed 时,系统 按需 union:既读自己的 inbox,再去读超级大号的事件流拼起来。
- 减少爆炸式写放大与热点分片。
- 批处理: 对同 viewer 的多条事件合并 batch 写,降低 QPS。
7.3 缓存与失效
- 写成功后发布失效消息 (或版本号对比)清理
current_signature:{user}。 history_head使用版本游标+短 TTL,命中首屏。- 防穿透:对不存在用户/空历史做阴性缓存短 TTL。
7.4 失败与恢复
- Kafka 宕机:Outbox 作为缓冲,重试 + DLQ;
- 分区热点:按
user_id扩 shard;超级大号切换策略; - 合规删除:写历史
deleted=1并发 tombstone 事件;清理缓存与索引。
23 Design i18n (internationalization) 国际化系统
Step 1. Functional Requirements
- Locale 识别与协商: 按优先级解析
url?lang=<?>> 用户设置 > Cookie > Accept-Language > 默认站点语言;支持地区化zh-CN/zh-TW/en-GB。 - 文案管理: Key-based 文案(
namespace.key);命名空间拆分(auth, checkout, common);支持占位符、复数、性别、选择(ICU MessageFormat)。 - 格式化: 日期/时间/货币/数字/相对时间/度量单位(基于 CLDR/Intl API)。
- 回退策略:
zh-HK -> zh-TW -> zh -> en;缺失键可上报。 - RTL/LTR: 方向切换、组件镜像、样式变量。
- 运行时切换: 用户在前端切换语言即时生效(不刷新或最小刷新)。
- 翻译工作流: Key 发现(提取器)→ TMS 任务 → 机器翻译预填 → 人审 → QA → 上线;支持截图上下文与字符长度限制。
- A/B 与灰度: 按环境/租户/实验分支选择不同词条版本(可用于文案实验)。
- 动态内容: 后端模板、服务端渲染、通知邮件、PDF 导出、推送文案统一走 i18n。
- 权限与审计: 翻译、审核、发布可追溯;不同团队/租户的词条隔离。
Step 2. Non-functional Requirements
- 可用性: 99.9%;词条拉取可用且具回退与缓存兜底。
- 性能: 首屏包按需加载;P95 词库获取 < 50ms(CDN 命中)/ < 5ms(本地缓存)。
- 一致性: 构建版本与运行时词库版本可控;支持“冻结”版本以避免线上抖动。
- 可扩展: ≥ 数百万词条、百余语言;单语言包可分片。
- 可观测: 缺失键计数、回退率、包体体积、缓存命中、版本分布、TMS 周期。
Step 3. Core Entities
- Locale: 定义一种语言/地区配置
- id: 语言标识,含地区。例如
zh-CN,en-GB - fallback_chain: 回退链。运行时按链路逐级查。例如
["zh-CN","zh","en"] - rtl: 是否右到左(影响UI布局和样式)。布尔值
- numbering_system: 数字系统/本地化数字。例如
latn,arab
- id: 语言标识,含地区。例如
- Message: 单条文案的翻译键值对
- namespace: 业务命名空间。例如
checkout,auth - key: 文案键。例如
total.amount - value: 文案内容,支持 ICU MessageFormat。例如
共 {count} 件 - locale: 所属语言。例如
zh-CN - version: 生效版本号。例如
2025.09.19.1 - meta.context: 上下文说明,帮助翻译理解。例如
结算页合计 - meta.screenshot: 截图或上下文链接
- meta.char_limit: 字符数限制
- meta.tags: 标签,用于分类或检索。例如
["finance","total"]
- namespace: 业务命名空间。例如
- Bundle: 语言资源包 -> 把大量的文案键值对打包成一个可分发的文件 供前端/服务端按需加载
- id: 资源 ID,一般组合
locale + namespace + version - locale: 语言标识。例如
zh-CN - namespace: 命名空间。例如
checkout,common - version: 版本号。例如
2025.09.19.1 - hash: 内容哈希,用于 CDN 缓存与一致性校验
- size_bytes: 包体大小(字节数),用于监控
- storage_url: 静态文件地址。例如
/i18n/2025.09.19.1/zh-CN/checkout.json
- id: 资源 ID,一般组合
- Release: 一次不可变的版本发布,记录所有 Bundle 的集合。
- version: 发布版本号,唯一且不可变。例如
2025.09.19.1 - bundles: 包含的 bundle ID 列表
- frozen: 是否冻结,冻结后不可修改
- notes: 发布备注。例如
修复结算页复数问题 - created_at: 创建时间
- created_by: 发布人/系统。例如
ci-bot
- version: 发布版本号,唯一且不可变。例如
- Override: 在特定租户/环境/灰度下覆盖默认文案的配置。
- id: 覆盖规则 ID
- tenant_id: 租户或组织 ID。例如
tenantA - env: 环境标识。例如
prod,staging - locale: 语言标识。例如
zh-CN - namespace: 命名空间。例如
checkout - key: 文案键。例如
total.amount - value: 覆盖文案。例如
合计 {count} 件 - version_tag: 覆盖版本标签。例如
campaign_1127 - active: 是否启用
- priority: 优先级,数值越大优先级越高
- start_at / end_at: 生效时间区间,用于限时活动
- Event: 运行时产生的观测日志,用于追踪缺失键、回退、错误和延迟。
- id: 事件 ID(UUID)
- type: 事件类型。例如
MISSING、FALLBACK、FORMAT_ERROR、LATENCY - locale: 请求语言。例如
pt-BR - namespace: 命名空间。例如
checkout - key: 文案键。例如
total.amount - requested_version: 客户端请求的版本
- resolved_version: 实际命中的版本(可能是回退结果)
- fallback_path: 回退链路。例如
["pt-BR","pt","en"] - page / route: 页面或路由地址。例如
/checkout - ts: 时间戳
Step 4. APIs
# 运行时获取词库
GET /i18n/bundles?locale=zh-CN&namespaces=common,checkout&version=2025.09.19.1
Resp: { version, bundles: { "common": {...}, "checkout": {...} } }

# 单键查询(后端模板、邮件渲染)
POST /i18n/resolve
Body: { locale, entries: [{ ns, key, vars }] }
Resp: { results: ["渲染后的字符串", ...] }

# 缺失键与回退上报
POST /i18n/telemetry
Body: { locale, ns, key, type: "MISSING|FALLBACK|FORMAT_ERROR", page }

# 管理面:导入导出(TMS)
POST /i18n/export?locale=fr-FR&format=xliff
POST /i18n/import  (multipart xliff or json)

# 租户覆盖
POST /i18n/override
Body: { tenant_id, locale, ns, key, value, version_tag }
Step 5. Services
- Extractor(提取器)
- CI 阶段扫描源码
- 收集
t("ns.key")与 ICU 模板 -> International Components for Unicode - 收集并生成待翻译清单 -> 发送给 TMS 翻译平台
- TMS Connector: 与翻译管理系统交互
- 同步待翻译的文案 比如
key = checkout.total与上下文信息 - 提供机器翻译初稿
- 文案状态同步
未翻译→已机器翻译→已人工审核→已发布
- 同步待翻译的文案 比如
- I18n Build Service: 构建与发布翻译资源
- 合并与校验翻译内容 -> 从不同来源把同一语言的所有翻译条目汇总到一起并校验是否有报错
- 编译 ICU 模板 -> 按照对应的语法规则编译为可执行函数
- 按
namespace+locale生成分片 bundle - 推送静态文件至 CDN
- Runtime Resolver: 在运行时正确渲染翻译
- 运行时解析翻译
- 支持 SSR、邮件、PDF 渲染
- 执行回退链与变量校验
- Config & Versioning: 集中配置与版本管理
- 管理 fallback 链
- 管�理 rtl、默认 locale
- 管理冻结版本与灰度版本映射
- Telemetry: 提供可观测性与质量追踪
- 采集运行时缺失键
- 统计回退率与格式化错误
- 提供监控与报警数据
- Overrides Service: 支持多租户与实验文案覆盖*
- 根据租户/环境/实验返回覆盖值
- 按优先级合并:override > bundle > fallback